Bob's very itchy today (talk | contribs) (Replacing page with '<big> <big> <big> <big> <big> <big>HAHAHAHAHAHAHAHAHAHAHAHAHAHA Image:pwned.jpgImage:pwned.jpgImage:pwned.jpg') |
m (Reverted edits by Bob's very itchy today (Talk); changed back to last version by Arima) |
||
| Line 1: | Line 1: | ||
| + | {{Infobox DHARMA Station |
||
| − | <big> <big> <big> <big> <big> <big>HAHAHAHAHAHAHAHAHAHAHAHAHAHA |
||
| + | | Name=The Swan |
||
| + | | Image=Station3Swan logo.jpg |
||
| + | | Number=3 |
||
| + | | Purpose=[[Electromagnetism|Electromagnetic research]] |
||
| + | | Status=Possibly Destroyed (Imploded) |
||
| + | | Orientation=Swan Orientation Film |
||
| + | }} |
||
| + | '''The Swan''' a.k.a '''the Hatch''', was [[DHARMA Initiative]] [[Station]] number 3, first discovered by [[Locke]] and [[Boone]]. According to its [[Swan Orientation Film|Orientation Film]], the Swan was originally a laboratory "where scientists could work to understand the unique electromagnetic fluctuations emanating from this sector of the Island". However, after an "[[Incident]]", a protocol had to be followed in which two people would take shifts [[Push the Button|pressing a button]] (inputting [[the Numbers]] into a [[Swan computer|computer]]) every [[108]] minutes for [[540]] days, at the end of which replacements will arrive to take the place of the previous inhabitants. It is located in the south-western region of the Island, about a mile inland of the crash of [[Flight 815]]. |
||
| + | ==Season One== |
||
| + | [[Image:Lost-season1.jpg|thumb|right|150px]] |
||
| + | During [[Season One|the first season]] of Lost, the main focus was gaining access to the Swan, which was (and still is) referred to as "[[the Hatch (Swan_Exterior)|the Hatch]]", and this was achieved {{crossref|1x24}} when [[Jack]], [[Kate]], [[Locke]] and [[Hurley]] brought back dynamite from {{link|the Black Rock}}. Just as they are setting up the dynamite, Hurley sees [[the Numbers]] engraved on the side of the Hatch, and rushes to prevent the explosion, but is pulled away to safety. The episode ends with Locke and Jack looking down into the long shaft inside the Hatch. |
||
| + | <br clear="all" /> |
||
| + | ===The Hatch=== |
||
| + | [[Image:Thehatchoutside.jpg |thumb|right|The Hatch was the big mystery in the first season]] |
||
| + | {{main|the Hatch (Swan Exterior)}} |
||
| + | "The Hatch" was first discovered by complete accident by [[Locke]] and [[Boone]]. {{crossref|1x11}} They proceeded to dig it up, without telling anyone until much later in the first season. Their first attempt at opening it was the construction of a large [[trebuchet]], designed to swing a large piece of plane shrapnel at the Hatch. This plan backfired, however, when a sharp piece of the shrapnel broke off and flew into Locke's leg. The second attempt was successful, using the [[dynamite]] obtained from {{link|the Black Rock}}. The inside of the Hatch ''(not visible from the outside)'' has "[[quarantine|QUARANTINE]]" spray-painted on it. |
||
| + | <br clear="all" /> |
||
| − | [[Image:pwned.jpg]][[Image:pwned.jpg]][[Image:pwned.jpg]] |
||
| + | |||
| + | ==Season Two== |
||
| + | [[Image:Lost-season2.jpg|thumb|left|150px]] |
||
| + | In [[Season Two|the second season]] of Lost, the losties ventured in, finding [[Desmond]], [[food#Artificial|a food supply]], a living space, and a strange computer in the "dome". Jack and Locke eventually decided to make a shift comprising of two people in the Swan at once, taking shifts pushing the button, with Locke believing it had significant importance. However, after Locke and [[Mr. Eko]] discovered [[the Pearl Orientation Video]], Locke lost all faith in the button, being led to believe it was all a psychological experiment. Eko on the other hand, felt that [[Push the Button|pushing the button]] was more important than anything. Later, Locke recruited Desmond in a plan to not enter the Numbers. Mr. Eko protests, however is shut out when Desmond activates the [[blast door|blast doors]]. The [[Countdown Timer]] ran out, causing a [[system failure]], and the Numbers flipped to the five [[hieroglyphs]]. It caused what seemed to be an earthquake. All the objects made of metal soon flew against the wall, attracted to something with an extremely powerful magnetic force. Locke realized that the Button did something after all, as did Desmond, who acted by entering the crawlspace underneath the floor of the Swan, and using the [[fail-safe]] to activate the "[[discharge]]". The Swan was completely destroyed. |
||
| + | <br clear="all" /> |
||
| + | |||
| + | ===Life in the Swan=== |
||
| + | [[Image:Normal_2fortheroad-promo07.jpg|thumb|left|[[Locke]], [[Ana Lucia]], [[Jack]] and [[Kate]] in the Swan]] |
||
| + | |||
| + | The swan was designed to be lived in by two people for 540 days, so many things are necessary for the sanity of the occupants. The are two bunk beds, a ping-pong table, a full plumbing system including a sink and a shower (It has been noted that the water has a sulfur taste and smell, implying that it is geothermally heated groundwater such as might be found in an underground hot spring), a food supply, [[List of Music featured in LOST#Songs Featured|music]] in the form of LP records, [[Appearances of Literary Works|literature]], a washer and dryer set and dining space. It seems geothermal power is the energy source for the station. Before the crash of [[Flight 815]], there were three known residents of the Hatch, the first two of which are (presumed) dead, [[Radzinsky]], [[Kelvin Joe Inman]], and [[Desmond]]. [[Locke]] and [[Jack]] spent considerable time in the Hatch, as well as [[Mr. Eko]], [[Michael]] and [[Kate]]. [[Libby]] and [[Ana Lucia]] both died in the Swan, after being shot by Michael. |
||
| + | |||
| + | ''See also: [[station explorers]]'' |
||
| + | |||
| + | <br clear="all" /> |
||
| + | |||
| + | ===The Swan Orientation Film=== |
||
| + | [[Image:Scenesfromorientationfilm2.jpg|thumb|right|Scenes from the film]] |
||
| + | {{main|Swan Orientation Film}} |
||
| + | |||
| + | Shortly after entering the station, [[Desmond]] directed [[Jack]] and [[Locke]] to the Swan's orientation film. In this film, which was placed behind a copy of ''[[The Turn of the Screw]]'', a [[Dr. Marvin Candle]] describes the purpose and origins of the station. The Swan station (referred to as station number 3) was once one of several [[DHARMA Initiative]] research stations, funded by the mysterious [[Hanso Foundation]]. Its purpose was to study [[electromagnetism]]. However after an unspecified [[incident]], a special protocol was set in place, referred to as "[[pushing the button]]". Every 108 minutes, [[the Numbers]] "4 8 15 16 23 42" are to be entered in [[the Swan computer]]. The film further details how the station is to be operated by two persons, working in shifts of 540 days (18 months). {{crossref|2x03}} |
||
| + | |||
| + | After the reunification of the [[tail section survivors]] with the [[middle section survivors]] of [[flight 815]], [[Mr. Eko]] revealed to Locke he had discovered a piece of the film in another DHARMA initiative station, [[the Arrow]]. In this piece, one of many cut out by [[Radzinsky]] according to [[Kelvin Inman]], Dr. Candle talks about how the computer should only be used for entering the Numbers every 108 minutes. Using the computer for communicating with the outside world could lead to compromising the project or even a new incident. {{crossref|2x09}} |
||
| + | <br clear="all" /> |
||
| + | |||
| + | ===The Mural=== |
||
| + | {{main|Mural}} |
||
| + | [[Image:Mural3.jpg|thumb|left|The mural]] |
||
| + | The mural is a large painting along the wall of the Swan. In the [[Season 2 DVD]], it was confirmed that the mural was created by [[Desmond]]. |
||
| + | |||
| + | Among the things depicted in the Mural are, the number [[108]] appears twice which is the addition of [[the Numbers]] this number is also the time that the countdown clock resets to, [[42]] and [[5]] can also be seen. There are also pictures of a black man and Caucasian woman. The black man is wearing a priest's cassock or other item of clerical clothing, and his eye is scratched out with a red line. |
||
| + | |||
| + | <br clear="all" /> |
||
| + | |||
| + | ===The computer=== |
||
| + | [[Image:HatchComputer2.png|thumb|right|The Swan computer]] |
||
| + | {{main|Swan computer}} |
||
| + | |||
| + | The computer is what is used to enter the Numbers every 108 minutes. When the [[Countdown Timer]] runs down to 4 minutes, an alarm goes off signaling that numbers need to be entered. One of the occupants of the Swan then types in '''"4 8 15 16 23 42"''', and then presses a button marked '''"EXECUTE"'''. It was revealed {{crossref|2x09|2x22}} that the computer could be used for communication, as [[Michael]] communicated with someone claiming to be his son, [[Walt]]. Michael was given instruction on how to find [[the Others]] camp. In [[the Pearl]], a station like the Swan, a [[Log printout|log]] was found of the history of the swan's computer's history of [[Push the Button|pushing the button]]. When the button is not pressed a [[system failure]] occurs. |
||
| + | |||
| + | <br clear="all" /> |
||
| + | |||
| + | ===Security=== |
||
| + | [[Image:Lost-0204-295-abc.jpeg|thumb|left|[[Locke]] and [[Hurley]] in the Gun Vault]] |
||
| + | [[Image:Lost_TV_Swan_Map2.png|thumb|70px|right|A map of the Swan]] |
||
| + | |||
| + | In the Swan there is a gun vault, containing an odd amount of [[weapons]] for a scientific endeavor, including pistols and sub-machine guns. It has a locked door with a combination, which has been changed many times. It was used as holding cell for [[Benjamin Linus|Ben]] after it was emptied of the guns. There is also an elaborate system of mirrors used to see up the long entry passage. |
||
| + | |||
| + | ''See also: [[Gun vault]]'' |
||
| + | |||
| + | <br clear="all" /> |
||
| + | |||
| + | ===Blast Door=== |
||
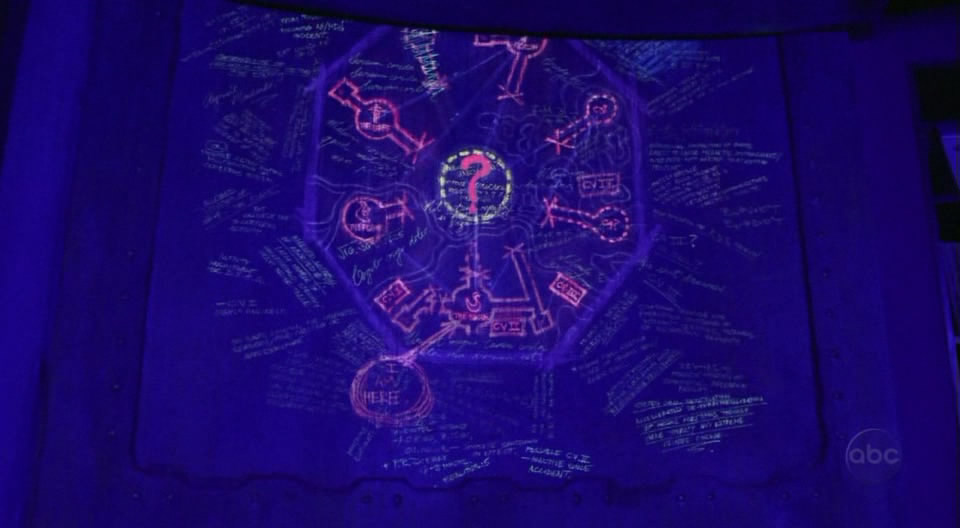
| + | [[Image:Blastdoor001.jpg|thumb|right|The blast door map]] |
||
| + | {{main|blast door map}} |
||
| + | |||
| + | Inside the Swan are a series of blast doors which can seal parts of the bunker in a "lockdown" mode, the cause and purpose of which is currently unknown. During the lockdown, a series of black lights reveals a huge, hand-drawn map on the surface of one of the blast doors. There are numerous handwritten notations on the map. Some are written in Latin, while others are written in English. The notes are written in several scripts, suggesting multiple contributors. The Latin phrases appear to be more of a running commentary than insightful notations about the map, while the majority of the notations written in English address the various stations, a cryptic incident, possible shutdowns, a Cerberus system, a DharmaTel network, scientific equations, and zoological research. After [[Locke]] was trapped under the blast door, {{crossref|2x17}}, he made an attempt to remember what he saw by drawing a map. |
||
| + | |||
| + | ''See also: [[Blast door map geography]], [[Blast door map notations]], [[Blast door map timeline]], [[Locke's map]] and [[lockdown incident]]'' |
||
| + | |||
| + | <br clear="all" /> |
||
| + | |||
| + | === Electromagnetism === |
||
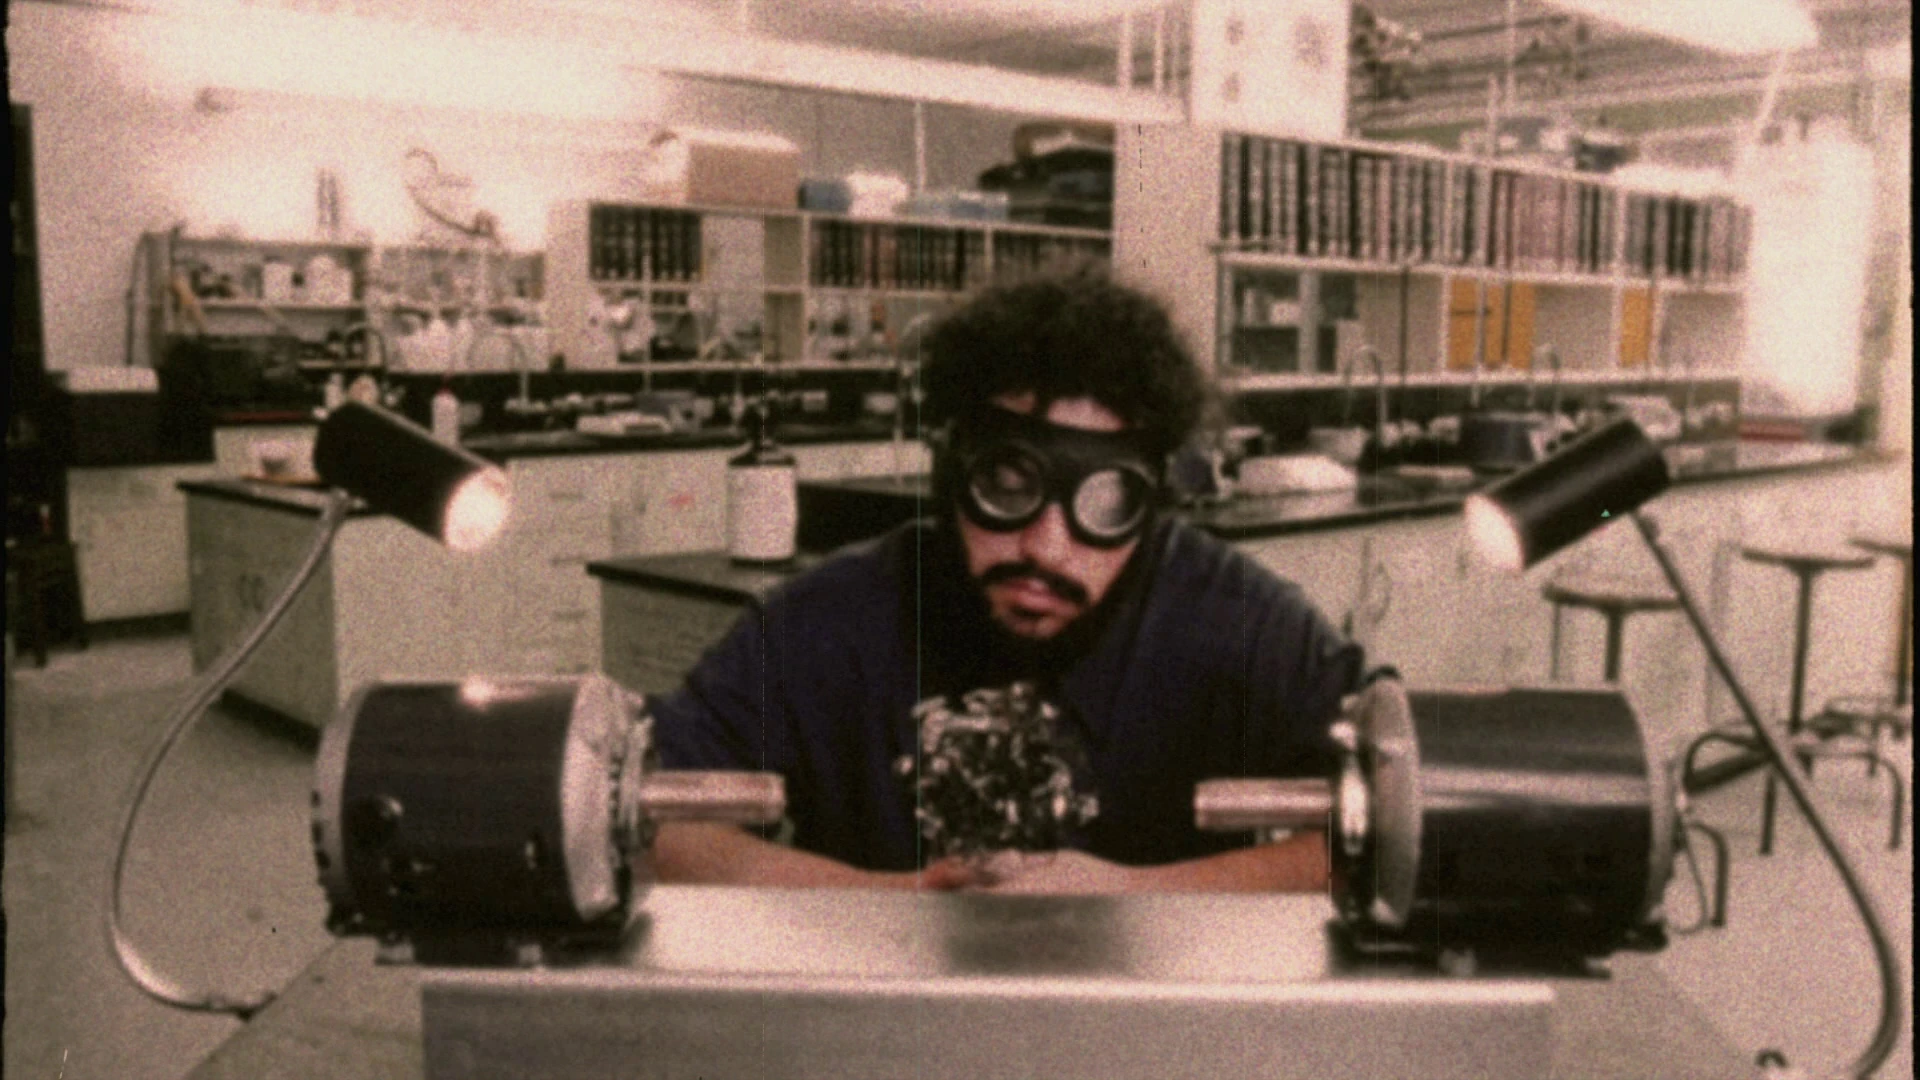
| + | [[Image:Electromagnetism.jpg|thumb|left|An electromagnetic experiment, as shown in the [[the Swan#The Swan Orientation Film|Orientation Film]]]] |
||
| + | |||
| + | {{main|Electromagnetism}} |
||
| + | |||
| + | During normal conditions, the Swan contains a benign magnetic field, most notable near the Mural. A section has been sealed off with concrete that is several feet thick (possibly after [[the Incident|the incident]] mentioned in the [[Swan Orientation Film]]). The magnetic source behind the concrete is strong enough to attract the key around [[Jack]]'s neck. the [[Swan Orientation Film]] indicates that the original purpose of the Swan was to study or regulate these magnetic properties. On several occasions, the field has grown to immense strengths and resulted in catastrophic effects inside and out of the Swan. |
||
| + | |||
| + | Underneath the floor of the Swan, there is a [[fail-safe]] mechanism. It appears that Desmond's activation of the fail-safe caused a drastic change in the magnetic field, resulting in the [[discharge]]. |
||
| + | |||
| + | <br clear="all" /> |
||
| + | |||
| + | ==Season Three== |
||
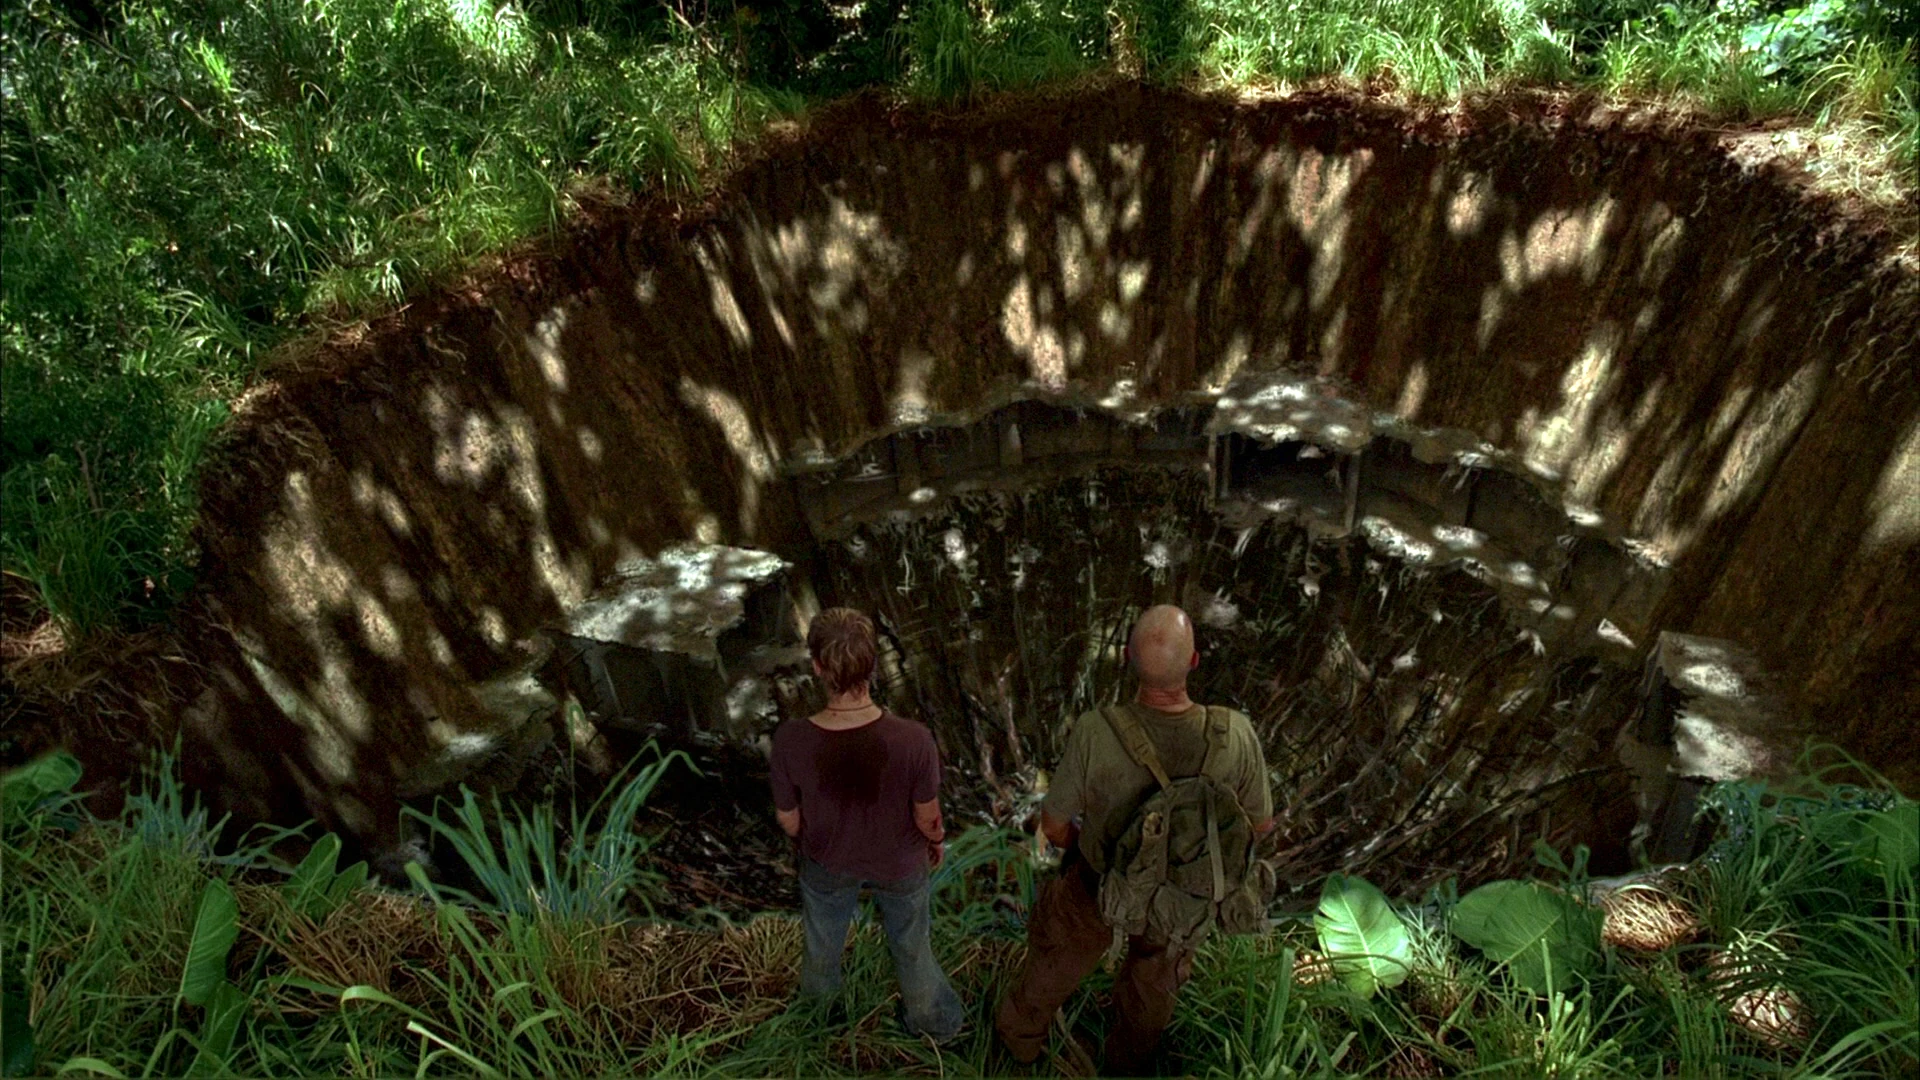
| + | [[Image:Hatch imploded.jpg|thumb|right|The Imploded Hatch]] |
||
| + | A gaping crater is left in the place where the Hatch door used to be. It is unknown whether or not the whole of the Swan, or just part of it, was destroyed due to [[Desmond]] using the [[fail-safe]], but it is possible that the Swan will not be revisited in the future. {{crossref|3x03}} |
||
| + | * It appears from the screen shot of the exploded Hatch/Swan, that some parts of the station may still exist to some extent, based on the hallways, 3 clearly visable and it is possible a fourth exists under where Locke/Charlie are standing. The Losties may still revisit the station through the main door. If it's intact and undamaged.<br clear="all" /> |
||
| + | |||
| + | ==Found in the Swan== |
||
| + | * Books |
||
| + | ** [[After All These Years]] |
||
| + | ** [[Hindsight]] |
||
| + | ** [[Occurrence At Owl Creek Bridge]] |
||
| + | ** [[Our Mutual Friend]] (Brought there by [[Desmond]]) |
||
| + | ** [[The Brothers Karamazov]] |
||
| + | ** [[The Third Policeman]] |
||
| + | ** [[The Turn of the Screw]] |
||
| + | * [[Countdown Timer]] |
||
| + | ** [[Hieroglyphs]] |
||
| + | * [[CR 4-81516-23 42]] (The unknown injection substance) |
||
| + | * [[Desmond's photograph]] |
||
| + | * [[Fail-safe]] |
||
| + | * Food |
||
| + | ** [[Apollo Candy Bar]] |
||
| + | ** [[Dharma Ranch Dressing]] |
||
| + | ** [[Peanut Butter]] |
||
| + | * [[HAZMAT suit]] |
||
| + | * [[Joshua Tree Print]] |
||
| + | * [[Mural]] painting |
||
| + | * Records |
||
| + | ** [[Make Your Own Kind of Music]] |
||
| + | ** [[Geronimo Jackson]] |
||
| + | * [[Record player]] |
||
| + | * [[Swan computer]] |
||
| + | * [[Swan Orientation Film]] |
||
| + | |||
| + | ==Trivia== |
||
| + | * According to the [[Season 2 DVD]] featurette [[Secrets from the Hatch]], the Swan interior was originally inspired by Tomorrowland at Disneyworld (how people in the 70s might picture the future). |
||
| + | * On the DVDs, [[Damon Lindelof]] says "the function of the Hatch, what it is built for, is because there was this accident here. Basically, if you were to perceive the fact that the Hatch is a structure that is essentially a big thumb, and that thumb is sticking in a dyke. And that dyke is holding back this massive electromagnetic anomaly that is just sort of illustrated on the other side of this wall that makes Jack's key rise. That's what the design is." |
||
| + | * The only time a survivor refers to the Hatch as "the Swan" is when [[Eko]] refers to it when looking at [[Locke's map]], every other time, it is referred to as [[The Hatch (Swan exterior)|the Hatch]]. {{crossref|2x21}} |
||
| + | ===Name references=== |
||
| + | :''See [[The_Swan/Theories|the theories section]] for possible name references for The Swan.'' |
||
| + | |||
| + | ==Blueprints== |
||
| + | A number of blueprints of the design of the Swan Station interior are found on the [[Season 2 DVD]] special featurette, [[Secrets From the Hatch]] (more at that page). |
||
| + | <gallery> |
||
| + | Image:Hatch2.jpg |
||
| + | Image:Hatch3.jpg |
||
| + | Image:Hatch4.jpg |
||
| + | Image:Hatch5.jpg |
||
| + | </gallery> |
||
| + | |||
| + | ==Pandora's Box== |
||
| + | ''Epimetheus told Pandora never to open a box she had received from Zeus. However, one day, Pandora's curiosity got the better of her and she opened it, releasing all the misfortunes of mankind (plagues, sorrow, poverty, crime, etc.). Once opened, she shut it in time to keep one thing in the box. The world remained extremely bleak for an unspecified interval, until Pandora "chanced" to revisit the box, she opened it again and Hope fluttered out.'' |
||
| + | |||
| + | In ''LOST'' several references are made to Pandora's Box, one related to the Swan station: |
||
| + | *[[Hugo "Hurley" Reyes|Hurley]] asks Locke what he thinks is in the Hatch. Locke responds, "Hope." |
||
| + | *Hurley, after telling [[Leonard]] he used "the Numbers" to win the lottery, was told he had "opened the box". |
||
| + | |||
| + | ==Unanswered questions== |
||
| + | {{NavMinor-Unanswered}} |
||
| + | *What is behind the concrete wall? |
||
| + | *What happened inside the Swan during the [[incident]]? |
||
| + | *Is some of the interior still intact after the [[implosion]]? |
||
| + | *Why was the [[The Hatch (Swan exterior)|Hatch]] door sealed and the ladder inside the shaft broken? |
||
| + | |||
| + | == External links == |
||
| + | [http://www.youtube.com/watch?v=89AKlbxvYWw The Swan map in CS:Source(perfect)] |
||
| + | |||
| + | {{Nav-Locations}} |
||
| + | [[Category:Unsolved]] |
||
| + | [[Category:Season 2]] |
||
| + | [[Category:Stations|Swan]] |
||
| + | [[Category:Island locations|Swan]] |
||
| + | {{featured article}} |
||
Revision as of 21:01, 15 February 2007
Template:Infobox DHARMA Station The Swan a.k.a the Hatch, was DHARMA Initiative Station number 3, first discovered by Locke and Boone. According to its Orientation Film, the Swan was originally a laboratory "where scientists could work to understand the unique electromagnetic fluctuations emanating from this sector of the Island". However, after an "Incident", a protocol had to be followed in which two people would take shifts pressing a button (inputting the Numbers into a computer) every 108 minutes for 540 days, at the end of which replacements will arrive to take the place of the previous inhabitants. It is located in the south-western region of the Island, about a mile inland of the crash of Flight 815.
Season One


During the first season of Lost, the main focus was gaining access to the Swan, which was (and still is) referred to as "the Hatch", and this was achieved ("Exodus, Part 2") when Jack, Kate, Locke and Hurley brought back dynamite from the Black Rock. Just as they are setting up the dynamite, Hurley sees the Numbers engraved on the side of the Hatch, and rushes to prevent the explosion, but is pulled away to safety. The episode ends with Locke and Jack looking down into the long shaft inside the Hatch.
The Hatch
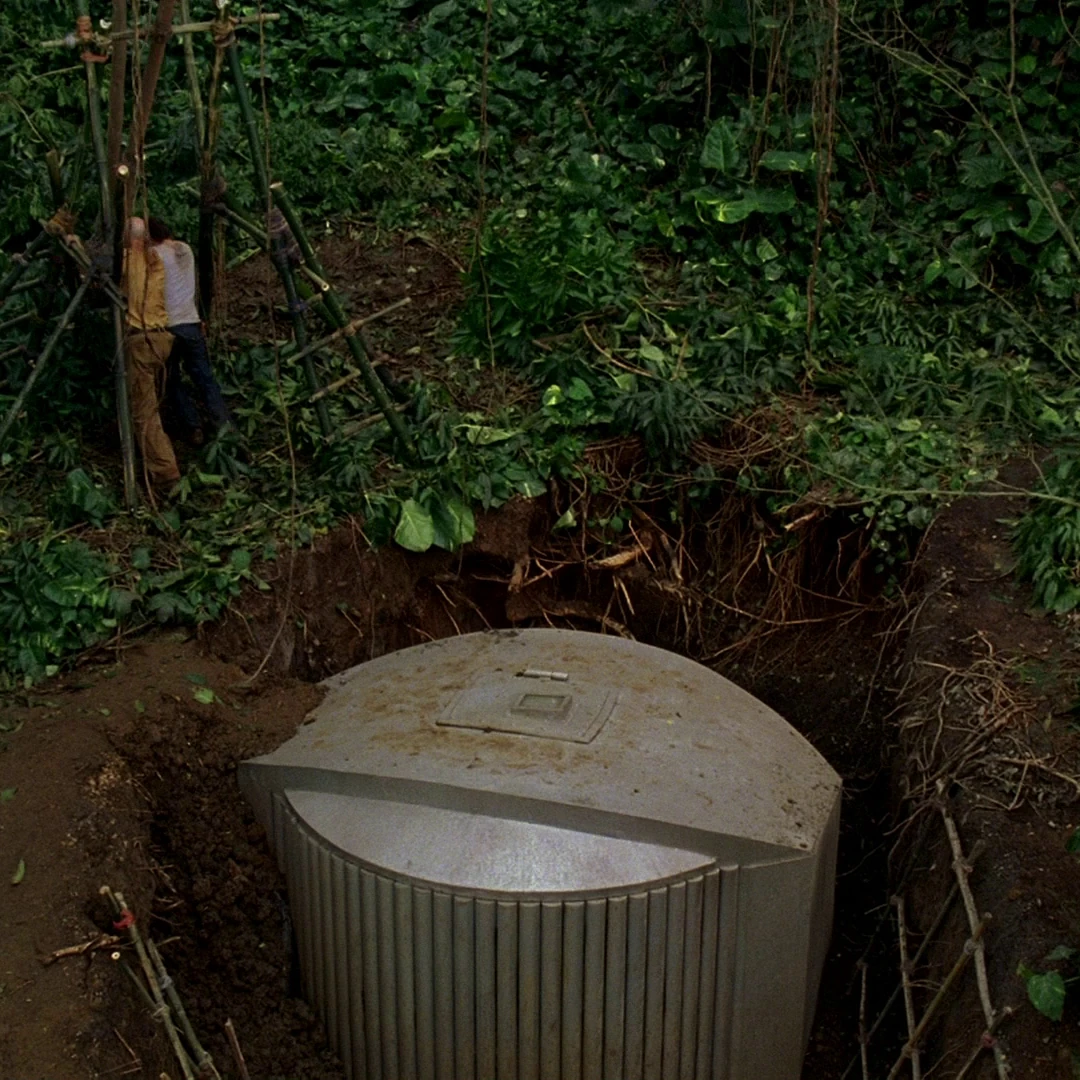
The Hatch was the big mystery in the first season
"The Hatch" was first discovered by complete accident by Locke and Boone. ("All the Best Cowboys Have Daddy Issues") They proceeded to dig it up, without telling anyone until much later in the first season. Their first attempt at opening it was the construction of a large trebuchet, designed to swing a large piece of plane shrapnel at the Hatch. This plan backfired, however, when a sharp piece of the shrapnel broke off and flew into Locke's leg. The second attempt was successful, using the dynamite obtained from the Black Rock. The inside of the Hatch (not visible from the outside) has "QUARANTINE" spray-painted on it.
Season Two


In the second season of Lost, the losties ventured in, finding Desmond, a food supply, a living space, and a strange computer in the "dome". Jack and Locke eventually decided to make a shift comprising of two people in the Swan at once, taking shifts pushing the button, with Locke believing it had significant importance. However, after Locke and Mr. Eko discovered the Pearl Orientation Video, Locke lost all faith in the button, being led to believe it was all a psychological experiment. Eko on the other hand, felt that pushing the button was more important than anything. Later, Locke recruited Desmond in a plan to not enter the Numbers. Mr. Eko protests, however is shut out when Desmond activates the blast doors. The Countdown Timer ran out, causing a system failure, and the Numbers flipped to the five hieroglyphs. It caused what seemed to be an earthquake. All the objects made of metal soon flew against the wall, attracted to something with an extremely powerful magnetic force. Locke realized that the Button did something after all, as did Desmond, who acted by entering the crawlspace underneath the floor of the Swan, and using the fail-safe to activate the "discharge". The Swan was completely destroyed.
Life in the Swan

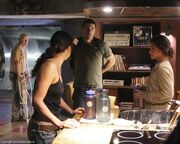
The swan was designed to be lived in by two people for 540 days, so many things are necessary for the sanity of the occupants. The are two bunk beds, a ping-pong table, a full plumbing system including a sink and a shower (It has been noted that the water has a sulfur taste and smell, implying that it is geothermally heated groundwater such as might be found in an underground hot spring), a food supply, music in the form of LP records, literature, a washer and dryer set and dining space. It seems geothermal power is the energy source for the station. Before the crash of Flight 815, there were three known residents of the Hatch, the first two of which are (presumed) dead, Radzinsky, Kelvin Joe Inman, and Desmond. Locke and Jack spent considerable time in the Hatch, as well as Mr. Eko, Michael and Kate. Libby and Ana Lucia both died in the Swan, after being shot by Michael.
See also: station explorers
The Swan Orientation Film
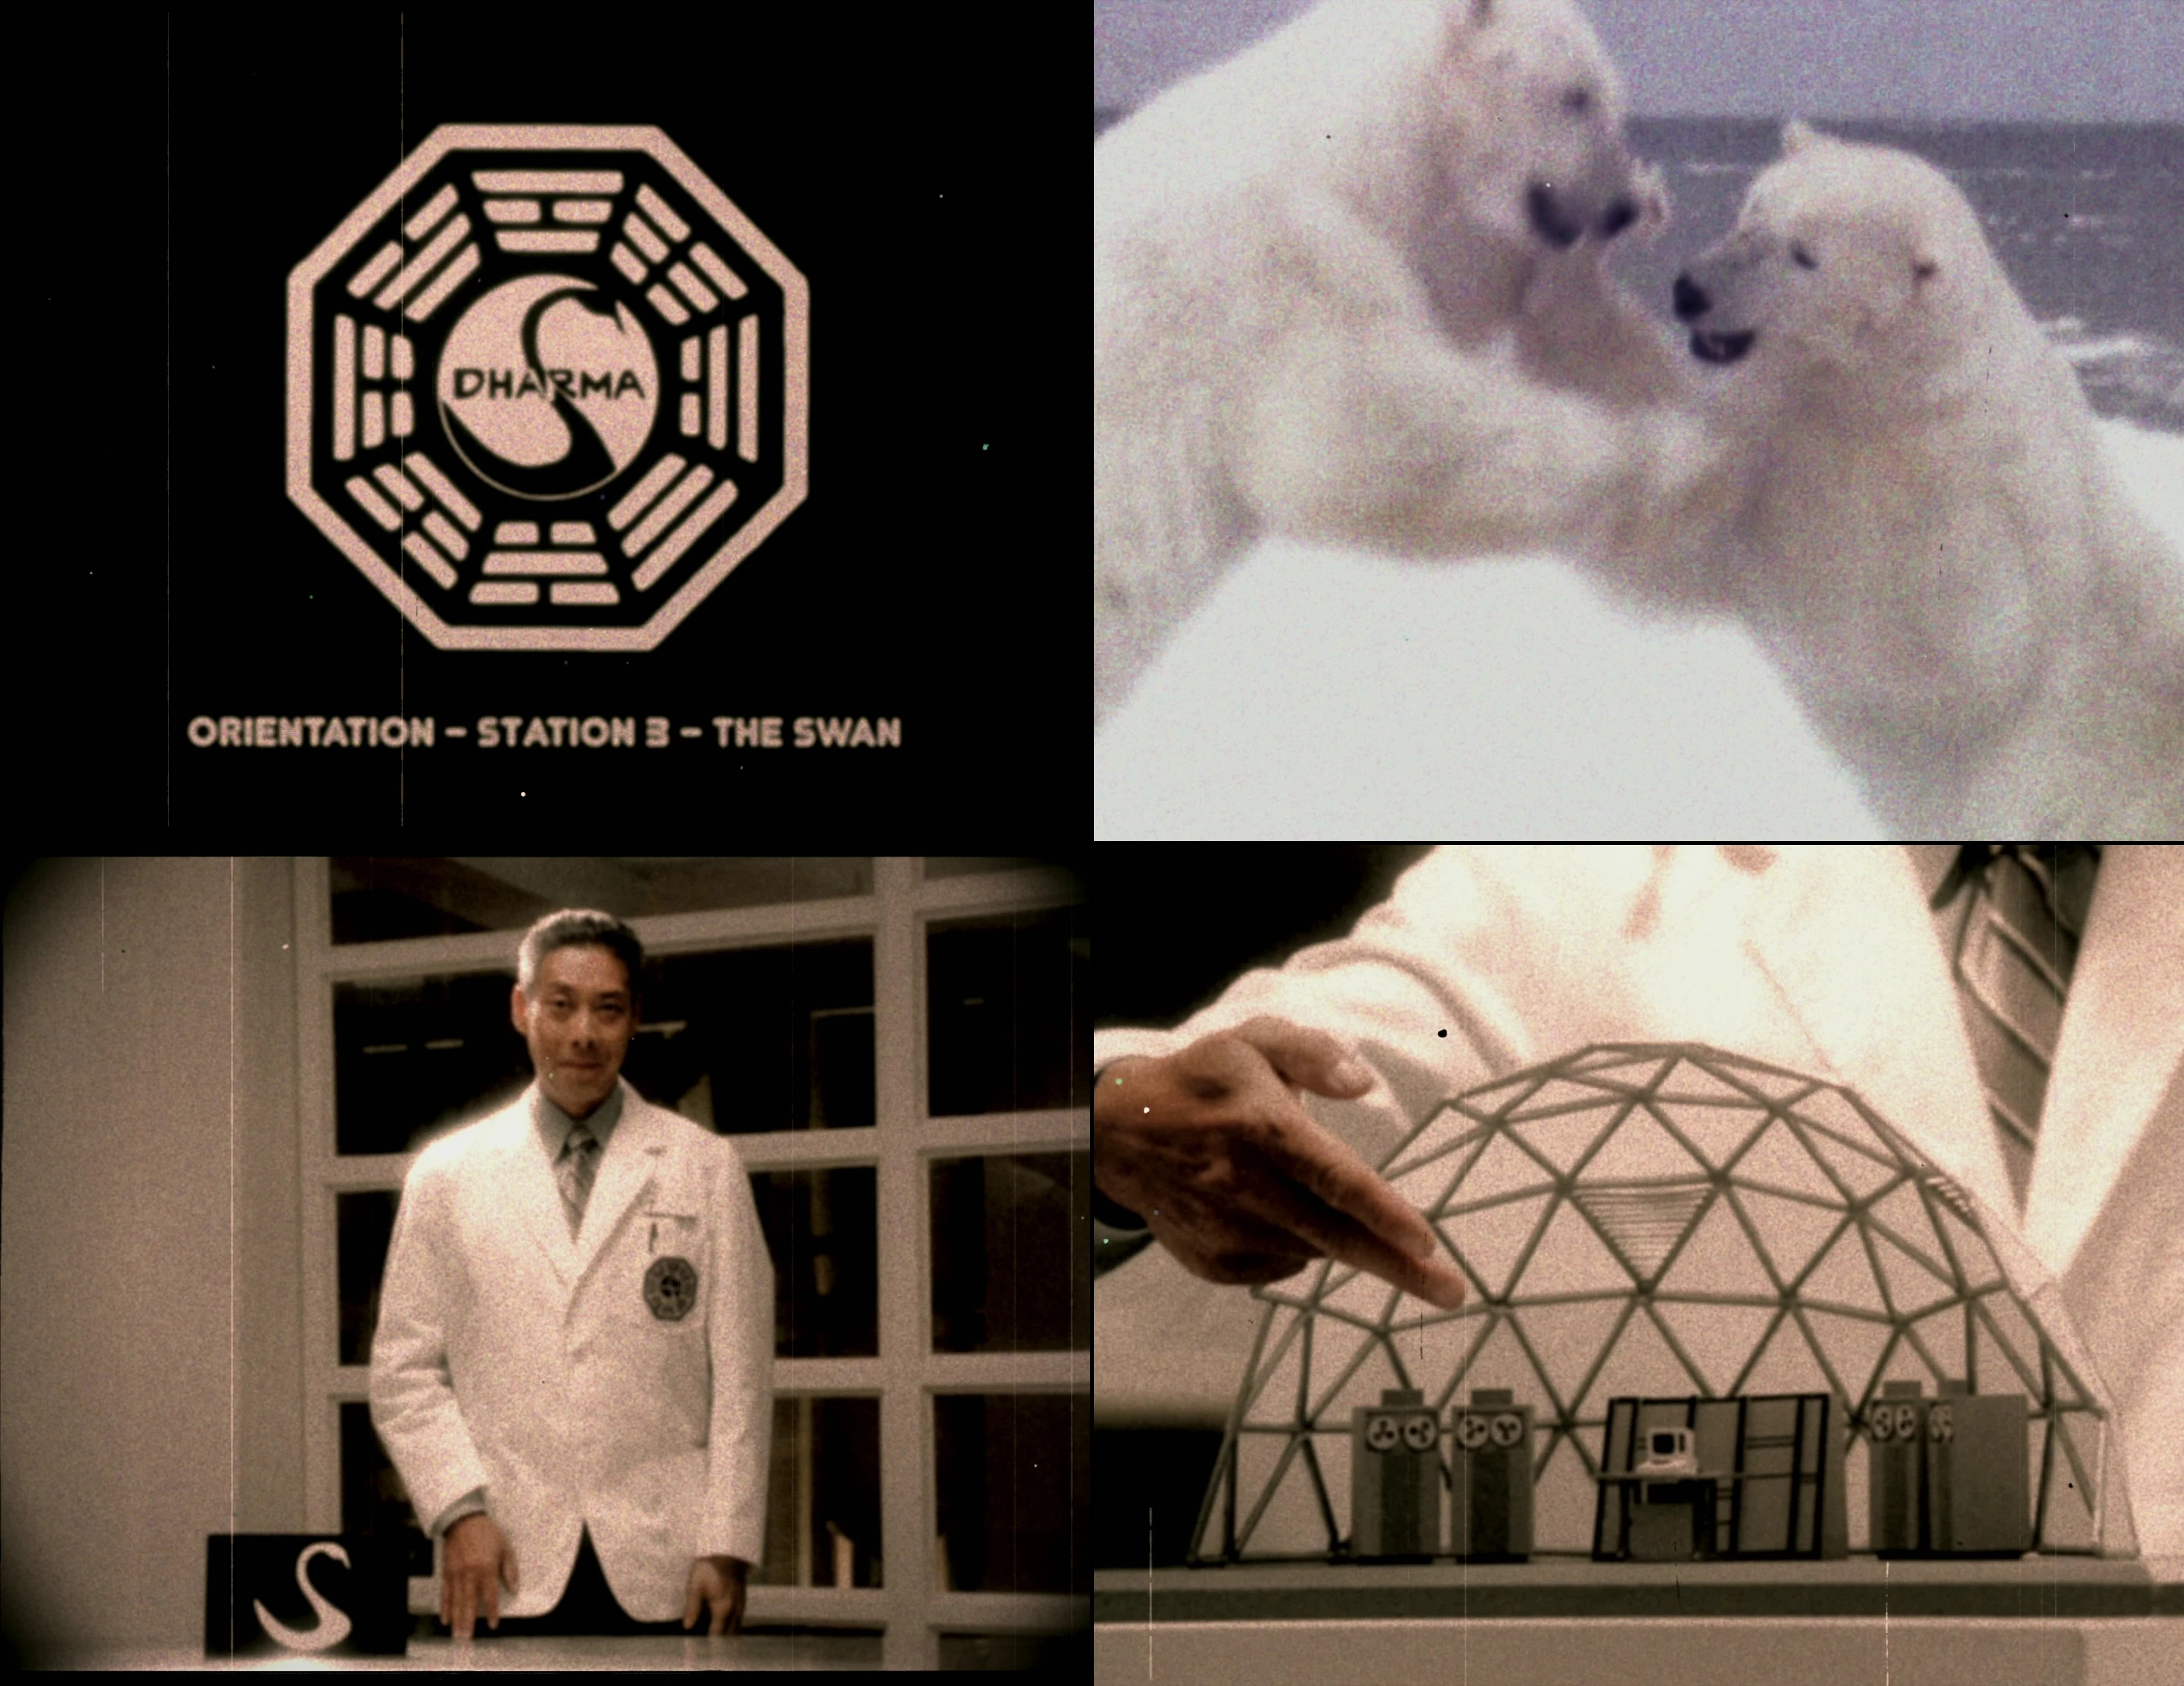

Scenes from the film
Shortly after entering the station, Desmond directed Jack and Locke to the Swan's orientation film. In this film, which was placed behind a copy of The Turn of the Screw, a Dr. Marvin Candle describes the purpose and origins of the station. The Swan station (referred to as station number 3) was once one of several DHARMA Initiative research stations, funded by the mysterious Hanso Foundation. Its purpose was to study electromagnetism. However after an unspecified incident, a special protocol was set in place, referred to as "pushing the button". Every 108 minutes, the Numbers "4 8 15 16 23 42" are to be entered in the Swan computer. The film further details how the station is to be operated by two persons, working in shifts of 540 days (18 months). ("Orientation")
After the reunification of the tail section survivors with the middle section survivors of flight 815, Mr. Eko revealed to Locke he had discovered a piece of the film in another DHARMA initiative station, the Arrow. In this piece, one of many cut out by Radzinsky according to Kelvin Inman, Dr. Candle talks about how the computer should only be used for entering the Numbers every 108 minutes. Using the computer for communicating with the outside world could lead to compromising the project or even a new incident. ("What Kate Did")
The Mural

The mural
The mural is a large painting along the wall of the Swan. In the Season 2 DVD, it was confirmed that the mural was created by Desmond.
Among the things depicted in the Mural are, the number 108 appears twice which is the addition of the Numbers this number is also the time that the countdown clock resets to, 42 and 5 can also be seen. There are also pictures of a black man and Caucasian woman. The black man is wearing a priest's cassock or other item of clerical clothing, and his eye is scratched out with a red line.
The computer

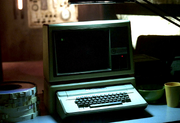
The Swan computer
The computer is what is used to enter the Numbers every 108 minutes. When the Countdown Timer runs down to 4 minutes, an alarm goes off signaling that numbers need to be entered. One of the occupants of the Swan then types in "4 8 15 16 23 42", and then presses a button marked "EXECUTE". It was revealed ("What Kate Did") ("Three Minutes") that the computer could be used for communication, as Michael communicated with someone claiming to be his son, Walt. Michael was given instruction on how to find the Others camp. In the Pearl, a station like the Swan, a log was found of the history of the swan's computer's history of pushing the button. When the button is not pressed a system failure occurs.
Security
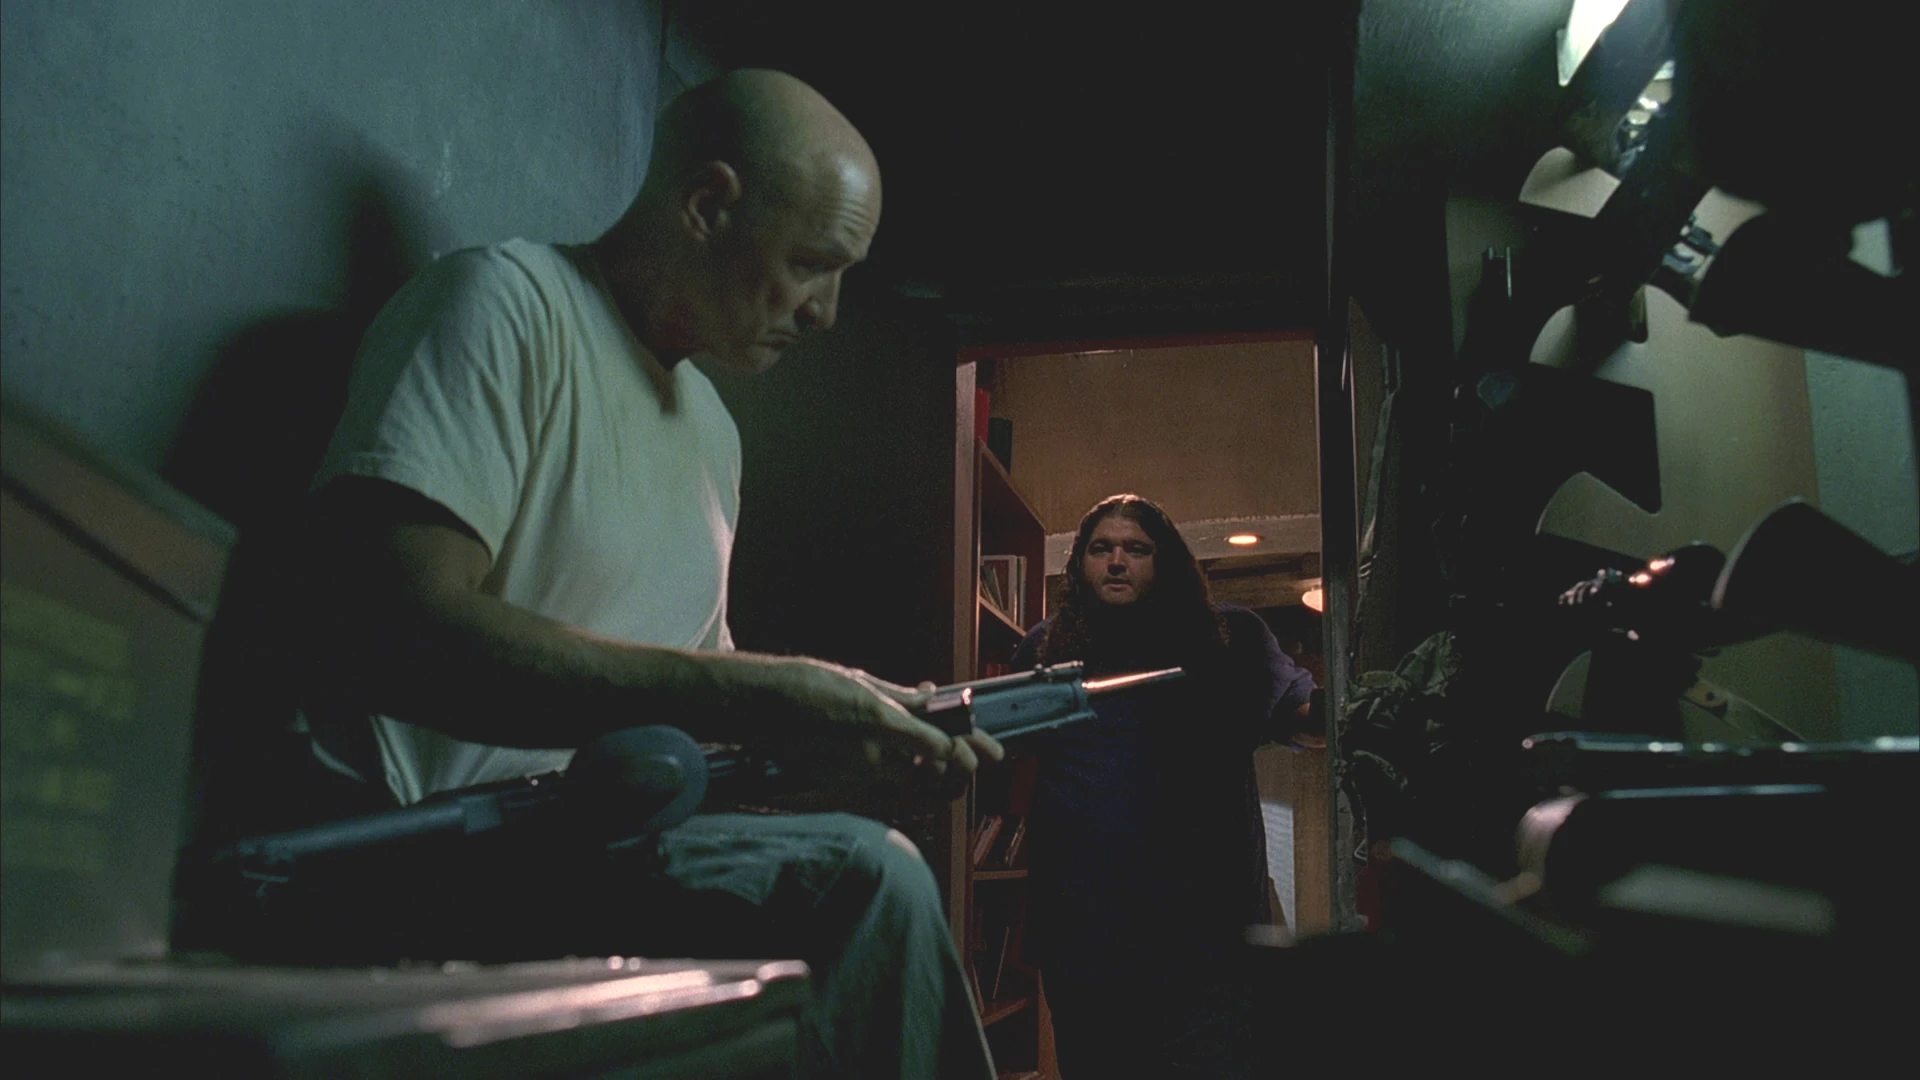

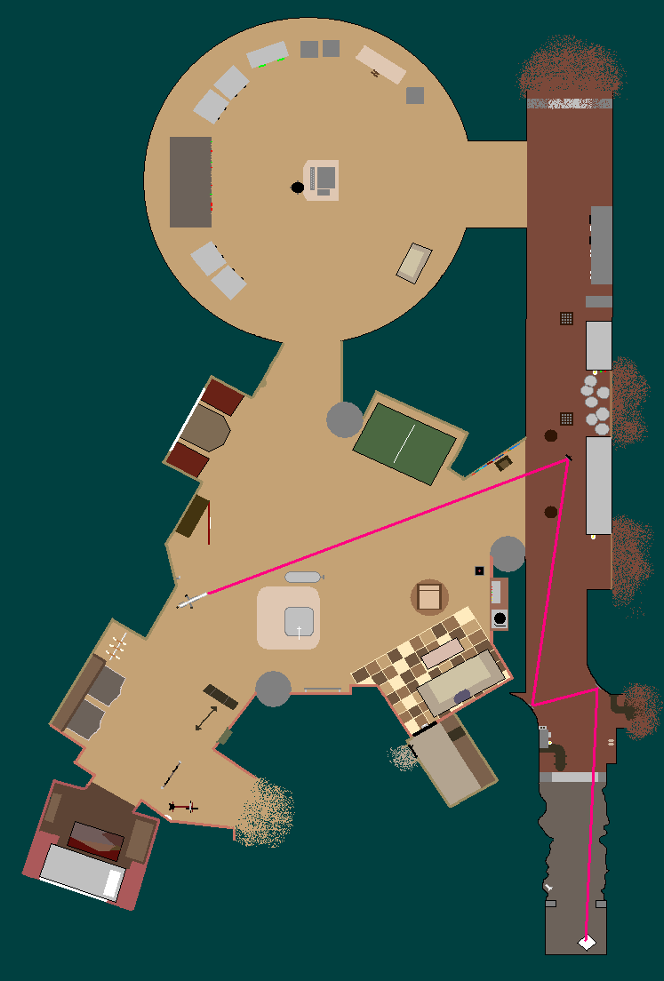

A map of the Swan
In the Swan there is a gun vault, containing an odd amount of weapons for a scientific endeavor, including pistols and sub-machine guns. It has a locked door with a combination, which has been changed many times. It was used as holding cell for Ben after it was emptied of the guns. There is also an elaborate system of mirrors used to see up the long entry passage.
See also: Gun vault
Blast Door

The blast door map
Inside the Swan are a series of blast doors which can seal parts of the bunker in a "lockdown" mode, the cause and purpose of which is currently unknown. During the lockdown, a series of black lights reveals a huge, hand-drawn map on the surface of one of the blast doors. There are numerous handwritten notations on the map. Some are written in Latin, while others are written in English. The notes are written in several scripts, suggesting multiple contributors. The Latin phrases appear to be more of a running commentary than insightful notations about the map, while the majority of the notations written in English address the various stations, a cryptic incident, possible shutdowns, a Cerberus system, a DharmaTel network, scientific equations, and zoological research. After Locke was trapped under the blast door, ("Lockdown"), he made an attempt to remember what he saw by drawing a map.
See also: Blast door map geography, Blast door map notations, Blast door map timeline, Locke's map and lockdown incident
Electromagnetism
An electromagnetic experiment, as shown in the Orientation Film
During normal conditions, the Swan contains a benign magnetic field, most notable near the Mural. A section has been sealed off with concrete that is several feet thick (possibly after the incident mentioned in the Swan Orientation Film). The magnetic source behind the concrete is strong enough to attract the key around Jack's neck. the Swan Orientation Film indicates that the original purpose of the Swan was to study or regulate these magnetic properties. On several occasions, the field has grown to immense strengths and resulted in catastrophic effects inside and out of the Swan.
Underneath the floor of the Swan, there is a fail-safe mechanism. It appears that Desmond's activation of the fail-safe caused a drastic change in the magnetic field, resulting in the discharge.
Season Three

The Imploded Hatch
A gaping crater is left in the place where the Hatch door used to be. It is unknown whether or not the whole of the Swan, or just part of it, was destroyed due to Desmond using the fail-safe, but it is possible that the Swan will not be revisited in the future. ("Further Instructions")
- It appears from the screen shot of the exploded Hatch/Swan, that some parts of the station may still exist to some extent, based on the hallways, 3 clearly visable and it is possible a fourth exists under where Locke/Charlie are standing. The Losties may still revisit the station through the main door. If it's intact and undamaged.
Found in the Swan
- Books
- Countdown Timer
- CR 4-81516-23 42 (The unknown injection substance)
- Desmond's photograph
- Fail-safe
- Food
- HAZMAT suit
- Joshua Tree Print
- Mural painting
- Records
- Record player
- Swan computer
- Swan Orientation Film
Trivia
- According to the Season 2 DVD featurette Secrets from the Hatch, the Swan interior was originally inspired by Tomorrowland at Disneyworld (how people in the 70s might picture the future).
- On the DVDs, Damon Lindelof says "the function of the Hatch, what it is built for, is because there was this accident here. Basically, if you were to perceive the fact that the Hatch is a structure that is essentially a big thumb, and that thumb is sticking in a dyke. And that dyke is holding back this massive electromagnetic anomaly that is just sort of illustrated on the other side of this wall that makes Jack's key rise. That's what the design is."
- The only time a survivor refers to the Hatch as "the Swan" is when Eko refers to it when looking at Locke's map, every other time, it is referred to as the Hatch. ("?")
Name references
- See the theories section for possible name references for The Swan.
Blueprints
A number of blueprints of the design of the Swan Station interior are found on the Season 2 DVD special featurette, Secrets From the Hatch (more at that page).
")
")
")
")
Pandora's Box
Epimetheus told Pandora never to open a box she had received from Zeus. However, one day, Pandora's curiosity got the better of her and she opened it, releasing all the misfortunes of mankind (plagues, sorrow, poverty, crime, etc.). Once opened, she shut it in time to keep one thing in the box. The world remained extremely bleak for an unspecified interval, until Pandora "chanced" to revisit the box, she opened it again and Hope fluttered out.
In LOST several references are made to Pandora's Box, one related to the Swan station:
- Hurley asks Locke what he thinks is in the Hatch. Locke responds, "Hope."
- Hurley, after telling Leonard he used "the Numbers" to win the lottery, was told he had "opened the box".
Unanswered questions
| Unanswered questions |
|---|
|
- For fan theories about these unanswered questions, see: The Swan/Theories
- What is behind the concrete wall?
- What happened inside the Swan during the incident?
- Is some of the interior still intact after the implosion?
- Why was the Hatch door sealed and the ladder inside the shaft broken?
External links
The Swan map in CS:Source(perfect)