Template:Infobox DHARMA Station The Pearl is DHARMA Initiative station number 5, discovered by Paulo and, much later, Locke and Mr. Eko (see list of station explorers). The task of this station, according to its orientation video, is to monitor the Swan station and possibly other stations via a remote viewing system. The purpose of the Pearl seems to be to study psychology. However it is presumed the work the Pearl staff was conducting was in fact useless, the notebooks they were asked to fill ending up at a dump. There was also a hidden camera present in the Pearl, indicating them, and not the Swan residents, were the subject of the experiment. Since the Swan Station actually has its own purpose - as seen at the end of Season 2 - it seems to be proven that the Pearl actually is a Psychology experiment.
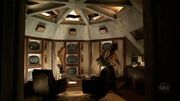
The station consists of a corridor with an octagonal tunnel leading down by ladder from the outside and one large, octagonal room, in which nine television sets are fed live surveillance pictures. There appears to be damage to this station: missing panels in the roof, loose wires, boulder in room. While there is a bathroom there are no living quarters for the Pearl's personnel, as they only served in eight-hour shifts.
A skeleton partially covered by some fabric with the logo from the Pearl is seen in the polar bear cave. ("Further Instructions")
First Discovery

The Pearl discovered by Paulo and Nikki
The Pearl was first stumbled upon by Nikki and Paulo on Day 24 while searching for their missing luggage. The Beechcraft was still suspended above the Pearl entryway, which was covered by a small amount of fresh dirt.
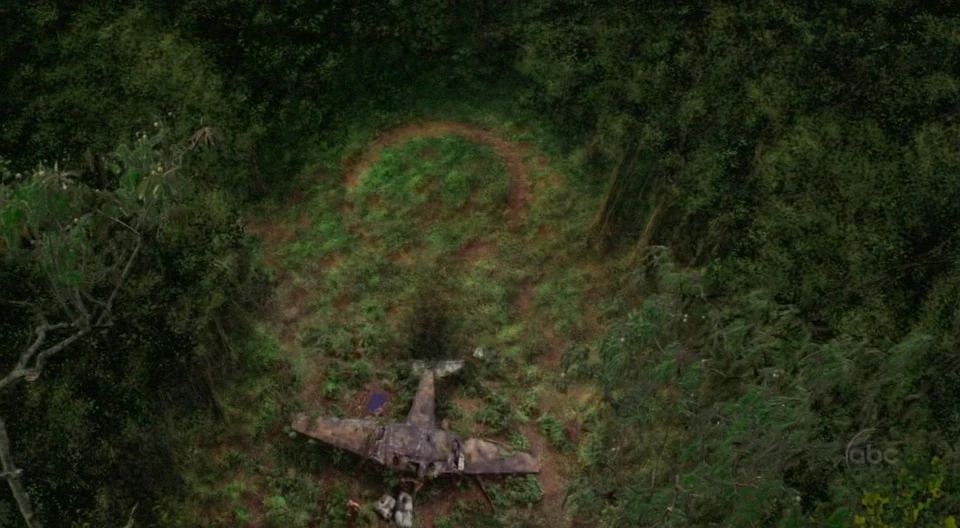
At that time, the pearl's hatch served as the question mark's dot.
The Others
The Others knew of the Pearl Station. They used it to observe the situation at the Swan probably starting between Day 45 and Day 47. Tom is said to have been at the Pearl around Day 47. (This would explain how he new that Locke was carrying a concealed weapon and how he knew of the movements of the castaways in the hatch.)
Later, on Day 49, Paulo returns to the Pearl to hide the diamonds. As he started to leave, Ben and Juliet walked in. Ben takes note that the entryway has been left open, and that Tom should move the fallen plane to better conceal the entryway. Ben turned the station on, monitoring Jack in the Swan. Paulo remained hidden as Ben claimed he would influence Jack to do the surgery by exploiting his emotional attachments. Ben also indicates that he intends to use Michael, and his desire to find Walt, to bring Jack, Sawyer, and Kate to them rather than kidnapping them outright. Ben and Juliet left, and Paulo escaped soon after, taking a walkie-talkie left by the others.
The question mark
The Pearl covered by the plane, as seen by Mr. Eko
Main article: the ? (Pearl Exterior)
The Pearl station was then found by Locke and Mr. Eko, who were in search of the question mark at the center of the blast door map. During their search they stumbled upon the drug smugglers' plane. In a dream, Locke was inspired by Eko's brother Yemi to climb the cliff next to the aircraft. After climbing on top of this cliff, Mr. Eko noticed that next to the plane, a circle in the vegetation near the plane was visible. The mark in the grass was made through salting the ground, preventing anything from growing there. The circle in the vegetation, combined with the fallen plane, formed a question mark. The Pearl station's hatch doors appeared to be hidden under the crashed plane. Thus, while Locke and Eko found a question mark, it led them to find the Pearl Station and not necessarily the question mark itself. The station marked as "C4?" is likely to be the Pearl Hatch, as the words "The Pearl?" are written next to it on the map. ("?")
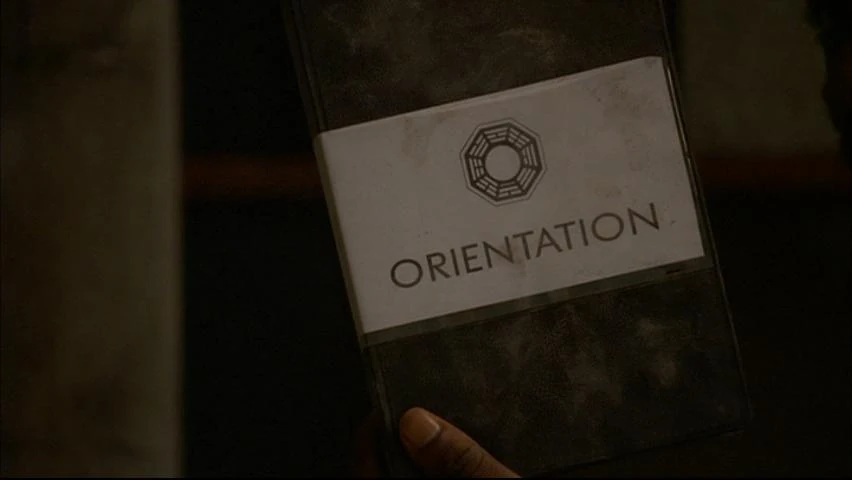
The Pearl's orientation video
The Pearl's Orientation video
Main article: Pearl Orientation Video
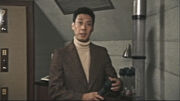
In one of the station's cupboards the Pearl's orientation video was discovered. According to this orientation film, the staff of the Pearl lives for three weeks in the station and monitor the occupants of the other stations in eight-hour shifts. After each shift they're taken to barracks via the Pala Ferry. Whenever an observation notebook is filled, it is placed in a pneumatic tube and sent to what is only described in the video as 'us'. The video is hosted by a man who introduces himself as Dr. Mark Wickmund; however, he looks identical to Dr. Marvin Candle from the Swan's orientation film with the notable difference that he has no prosthetic arm and is wearing different attire.
The monitor bank


A monitor showing Mikhail Bakunin

The Pearl's monitor bank
There is a monitor bank consisting of nine screens on the far wall of the facility. The monitors are configured in a 3x3 array and numbered, columns first. Each monitor has three circular operational dials each, in a vertical column. The upper two have similar designs, but the lower third dial is quite different and about twice the size. In activating the monitors, Locke used the big dial to turn on screens 1 through 3 and the upper small dial to turn on screen 7 (upper right). Screen 7 received a live video surveillance feed from the kitchen of the Swan station, showing Jack. All the other screens displayed static. Screen 5 was used to display the Pearl's orientation video, and Ben was able to manipulate it to display the same feed as screen 7. On top of the monitors, mounted on the wall, are three speakers. These likely transmitted audio from the station(s) that were being monitored.
It should be noted that when John looks up during the Pearl Orientation Video at the live feed of the Swan, the camera angle appears to have panned; now showing the hallway leading into the bunk area. The Hydra has a similar group of monitors which may be linked to the Pearl as well.
It is revealed that the Pearl is designed to monitor several stations at once. Sayid, while inspecting the I/O feeds for the computer, manages to patch a signal from a station which appears very similar to the Swan, later revealed to be the Flame. It is also revealed that the resident of this station, Mikhail, becomes aware of himself being observed. ("The Cost of Living")
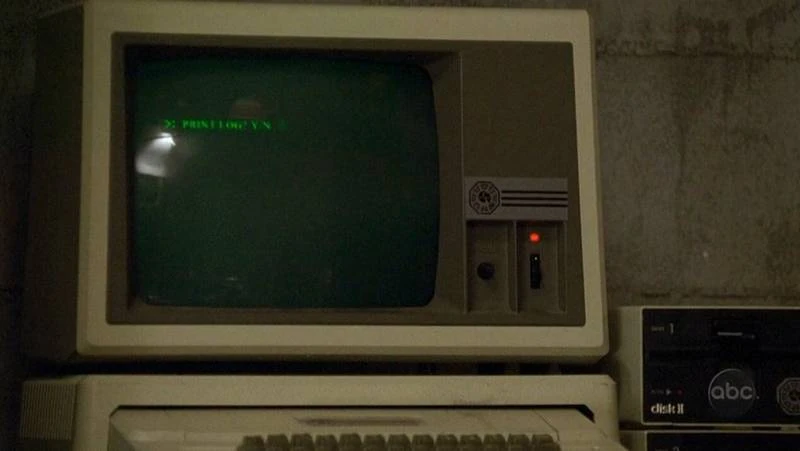
The computer
The Pearl's computer
Main article: Pearl computer
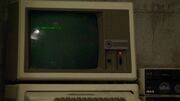
There is a computer present similar to the Swan's computer, with the addition of a printer (a Dharma-rebranded Apple ImageWriter II). Locke discovered its screen to be displaying the prompt "Print log? Y/N". Upon giving the "Y" command, the computer's dot-matrix printer printed the log printout, a repeating series of numeric codes, interspersed by the word "accepted", as "41602064:41 accepted 41602086:29 accepted", etc. These numbers indicate the time of activity on the Swan's Computer at which the inhabitants of the Swan station enter the Numbers and press "Execute". But not only the Numbers seem to be registered, the "system failure" warnings also appear on the logs. Most likely everything that is entered in the Swan's computer is logged. Interestingly, the Pearl's computer actually bears the logo of the Swan, as it is probally the same prop.
The chairs


The Pearl's chairs
There are two viewing seats each with a table and a magnifying viewing lens mounted on an adjustable arm assembly. Controls on the arms of the chairs seem to be made from spare parts. On the left arm of the left chair, a rocker switch similar to older style power windows can be seen. On the right arm of the right chair, Locke used the conventional stove dial to un-dim the lights in the room. On the dial these words can be read, starting on the right and moving counterclockwise: "HIGH", "MEDIUM", "WARM", and "OFF". On the table there's also a cigarette and debris that fell from the room's ceiling (this would be consistent with the minor structural damage seen elsewhere in this room).
The message tube

Dr. Mark Wickmund and the pneumatic tube
Main article: Pneumatic tube
There is a still working pneumatic tube in the Pearl station. The Pearl's personnel were supposed to put their notebooks in a container and send these up the tube. Their notebooks would then be delivered to what was described as 'us' in the Pearl's Orientation video. The actual location turned out to be a dump where the tubes were simply piling up, without anyone of the DHARMA initiative checking on them. Locke took his sketch of the blast door map and sent it up through these transport piping; it also ended up at the capsule dump. The map was found by Sawyer.
From this, one can gather that the psycholgical experiments going on in the pearl were to see if one would really write down everything that happened in some notebooks, and then shove them up a tube.
("Live Together, Die Alone, Part 1")
The Pearl's camera

The Pearl's camera
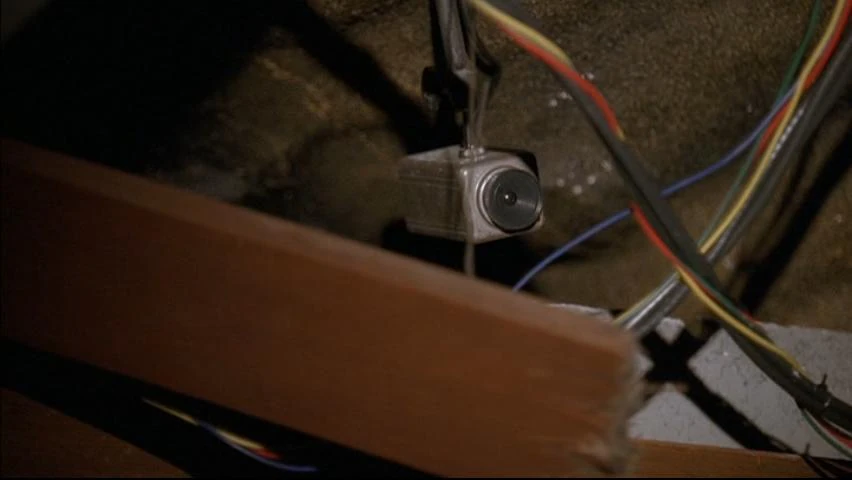
In one of the broken parts of the ceiling, a camera is visible, apparently filming the Pearl station and its personnel. It is presumed the Pearl's staff was unaware of this camera as it was hidden in the ceiling. But because of the damage to the station, the camera was uncovered, allowing Locke to spot it.
The Pearl's bathroom

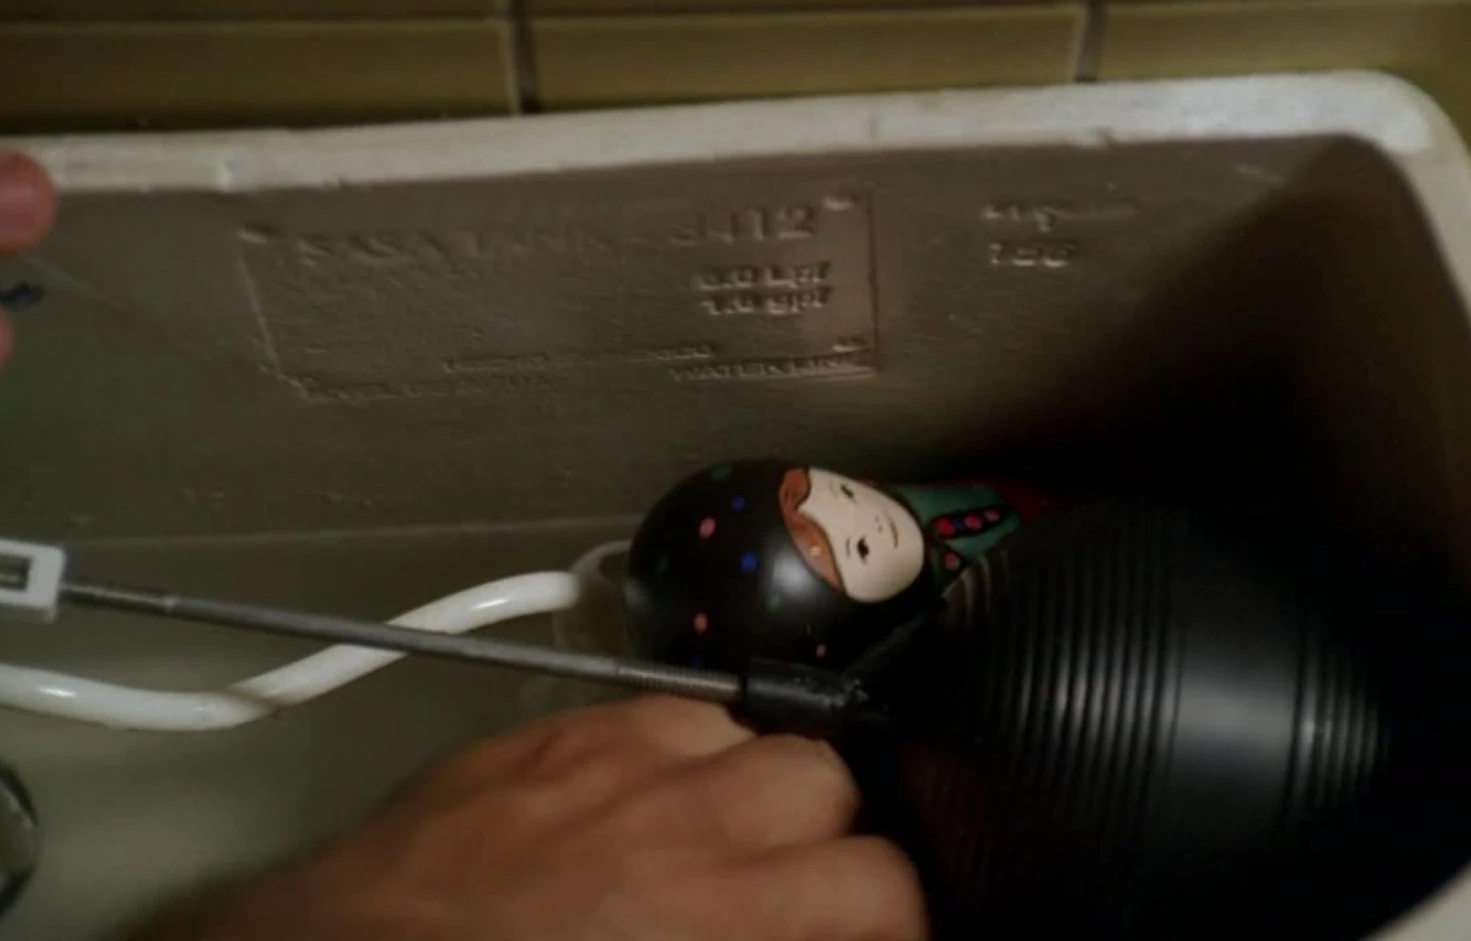
Paulo reaching into the toilet for the diamonds, hidden inside the Russian stacking doll.
The Pearl has at least one bathroom which Paulo uses in "The Cost of Living". Locke, Sayid and Nikki are surprised when they hear the toilet flush and turn to see what the noise was. As Paulo exits the bathroom he states, "The toilet still works," as he points behind him with his thumb.
It is later revealed in "Exposé" that Paulo had previously hidden diamonds in the toilet and entered the bathroom to retrieve them, flushing the toilet only to make it seem like he used the washroom.
Found in the Pearl
- Cigarette
- Log printout
- Pearl computer
- Pearl Orientation Video
- Pneumatic tube
- Matryoshka doll partially crushed in the toilet tank
Name
The names of the stations seem to be related to Apollo from Greek mythology. Apollo's twin sister was Artemis, goddess of the moon. The full moon can be represented as a pearl.
Unanswered Questions
| Unanswered questions |
|---|
|
- For fan theories about these unanswered questions, see: The Pearl/Theories
- Who is/was watching the inhabitants of the Pearl?
- Who are, or were, its previous occupants?
- How did Charlie get a Pearl notebook?
- If the Pearl, not The Swan was the experiment, then why did the computer record the numbers entered in the swan?
- What was actually the main purpose of the station?
- Is that heroin on the tables in the Pearl?