BalkOfFame (talk | contribs) m (→Time travel) |
m (Grammar/spelling) Tag: Visual edit |
||
| (29 intermediate revisions by 8 users not shown) | |||
| Line 8: | Line 8: | ||
| Constructed=[[DHARMA Initiative]] |
| Constructed=[[DHARMA Initiative]] |
||
| Status=Destroyed in the [[discharge]] |
| Status=Destroyed in the [[discharge]] |
||
| + | | Listen=<mp3 url="http://www.assembla.com/spaces/soundia/documents/bZJnnEH2Kr4jeteJe4gwI3/download/bZJnnEH2Kr4jeteJe4gwI3"/> |
||
| − | | Controlled=Formerly by [[Radzinsky]], [[Kelvin]], [[Desmond]] and [[Locke]] |
||
| + | | Controlled= |
||
}} |
}} |
||
| Line 17: | Line 18: | ||
===Discovery and excavation=== |
===Discovery and excavation=== |
||
{{I|I=All4.jpg|w=200|a=left|c=The Hatch discovered. {{crossref|1x11}}}} |
{{I|I=All4.jpg|w=200|a=left|c=The Hatch discovered. {{crossref|1x11}}}} |
||
| − | Locke discovered the Hatch after an unsuccessful hunt for [[Ethan Rom]]. Returning to camp, |
+ | [[John Locke|Locke]] and [[Boone Carlyle|Boone]] discovered the Hatch after an unsuccessful hunt for [[Ethan Rom]]. Returning to camp, Locke tossed Boone a flashlight, which fell on the steel hatch with a clunk. |
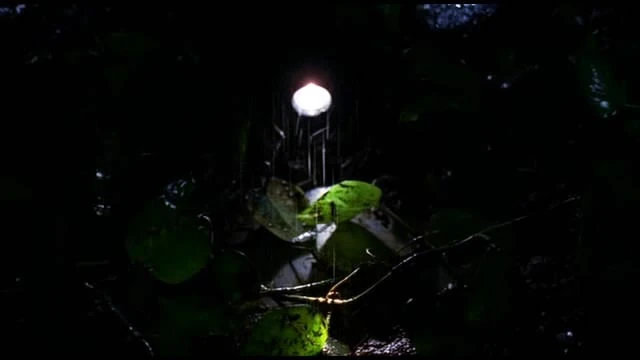
{{I|I= Ep1x19-hatch_light.jpg|a=right|w=200|c=[[Locke]] sees the light turn on in the Hatch. {{crossref|1x19}}}} |
{{I|I= Ep1x19-hatch_light.jpg|a=right|w=200|c=[[Locke]] sees the light turn on in the Hatch. {{crossref|1x19}}}} |
||
| − | The two men spent the next weeks excavating the hatch in secret, uncovering a large round steel tunnel leading down into the earth, topped by a steel door with a small rectangular glass window. They built a [[trebuchet]] to try to break the glass open, but it failed to damage the glass, split apart on impact and [[Healing_properties|wounded Locke's leg]]. |
+ | The two men spent the next weeks excavating the hatch in secret, uncovering a large round steel tunnel leading down into the earth, topped by a steel door with a small rectangular glass window. They built a [[trebuchet]] to try to break the glass open, but it failed to damage the glass, split apart on impact and [[Healing_properties|wounded Locke's leg]]. The next night, after taking the dying Boone to the [[Caves|caves]], Locke banged furiously on the Hatch door, questioning the Island's demands of him until a light turned on from within, restoring his faith. Unbeknownst to Locke, he had alerted the Swan's occupant, [[Desmond Hume]], that life continued outside the station. This dissuaded Desmond from [[suicide|killing himself]] and convinced him to continue the station's essential [[Pushing the button|protocol]]. {{crossref|1x11|1x19|2x24}} |
===Entry=== |
===Entry=== |
||
{{I|I= Ep2x01Hatch_light.jpg|a=left|w=200|c=[[Locke]] sees a beam of light escaping from the Hatch. {{crossref|2x01}}}} |
{{I|I= Ep2x01Hatch_light.jpg|a=left|w=200|c=[[Locke]] sees a beam of light escaping from the Hatch. {{crossref|2x01}}}} |
||
| − | [[Jack]] decided to open the Hatch to use as a safe hiding place for the survivors of [[Oceanic Flight 815]], following a warning from [[Danielle Rousseau]] that [[the Others]] |
+ | [[Jack]] decided to open the Hatch to use as a safe hiding place for the survivors of [[Oceanic Flight 815]], following a warning from [[Danielle Rousseau]] that [[the Others]] were coming, ostensibly to kill them. He, Locke, [[Dr. Arzt]], [[Kate]], and [[Hurley]] recovered several sticks of dynamite from the shipwreck of the ''[[Black Rock]]'' to blow the Hatch open. Hurley protested at the last second, noticing that [[the Numbers]] that he considered unlucky engraved into the side of the Hatch. In the final shot of [[Season 1]], [[Locke]] and [[Jack]] gazed down the Hatch into the long, dark, narrow vertical shaft below. {{crossref|1x24}} |
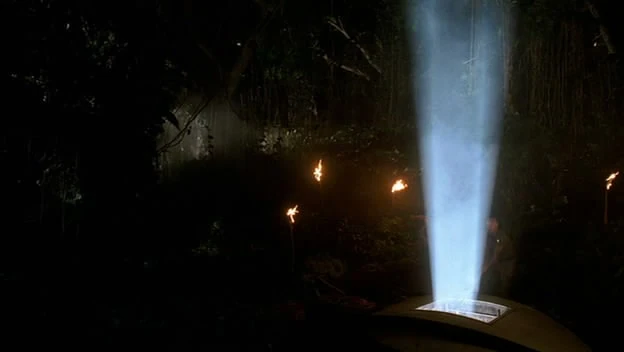
Locke lowered [[Kate]] into the Hatch. Soon after, she was pulled down as a large beam of light came out of the shaft entrance. Desmond had used the beam to blind Kate while he captured her and brought her into the Hatch. Locke descended after her, and Jack lowered himself in soon after. {{crossref|2x01}} |
Locke lowered [[Kate]] into the Hatch. Soon after, she was pulled down as a large beam of light came out of the shaft entrance. Desmond had used the beam to blind Kate while he captured her and brought her into the Hatch. Locke descended after her, and Jack lowered himself in soon after. {{crossref|2x01}} |
||
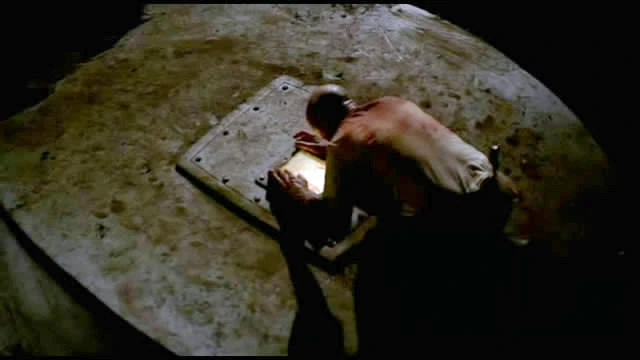
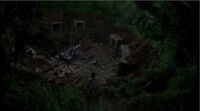
{{I|I=Hatch_imploded.jpg|a=right|w=200|c=The imploded Hatch. {{crossref|3x03}}}} |
{{I|I=Hatch_imploded.jpg|a=right|w=200|c=The imploded Hatch. {{crossref|3x03}}}} |
||
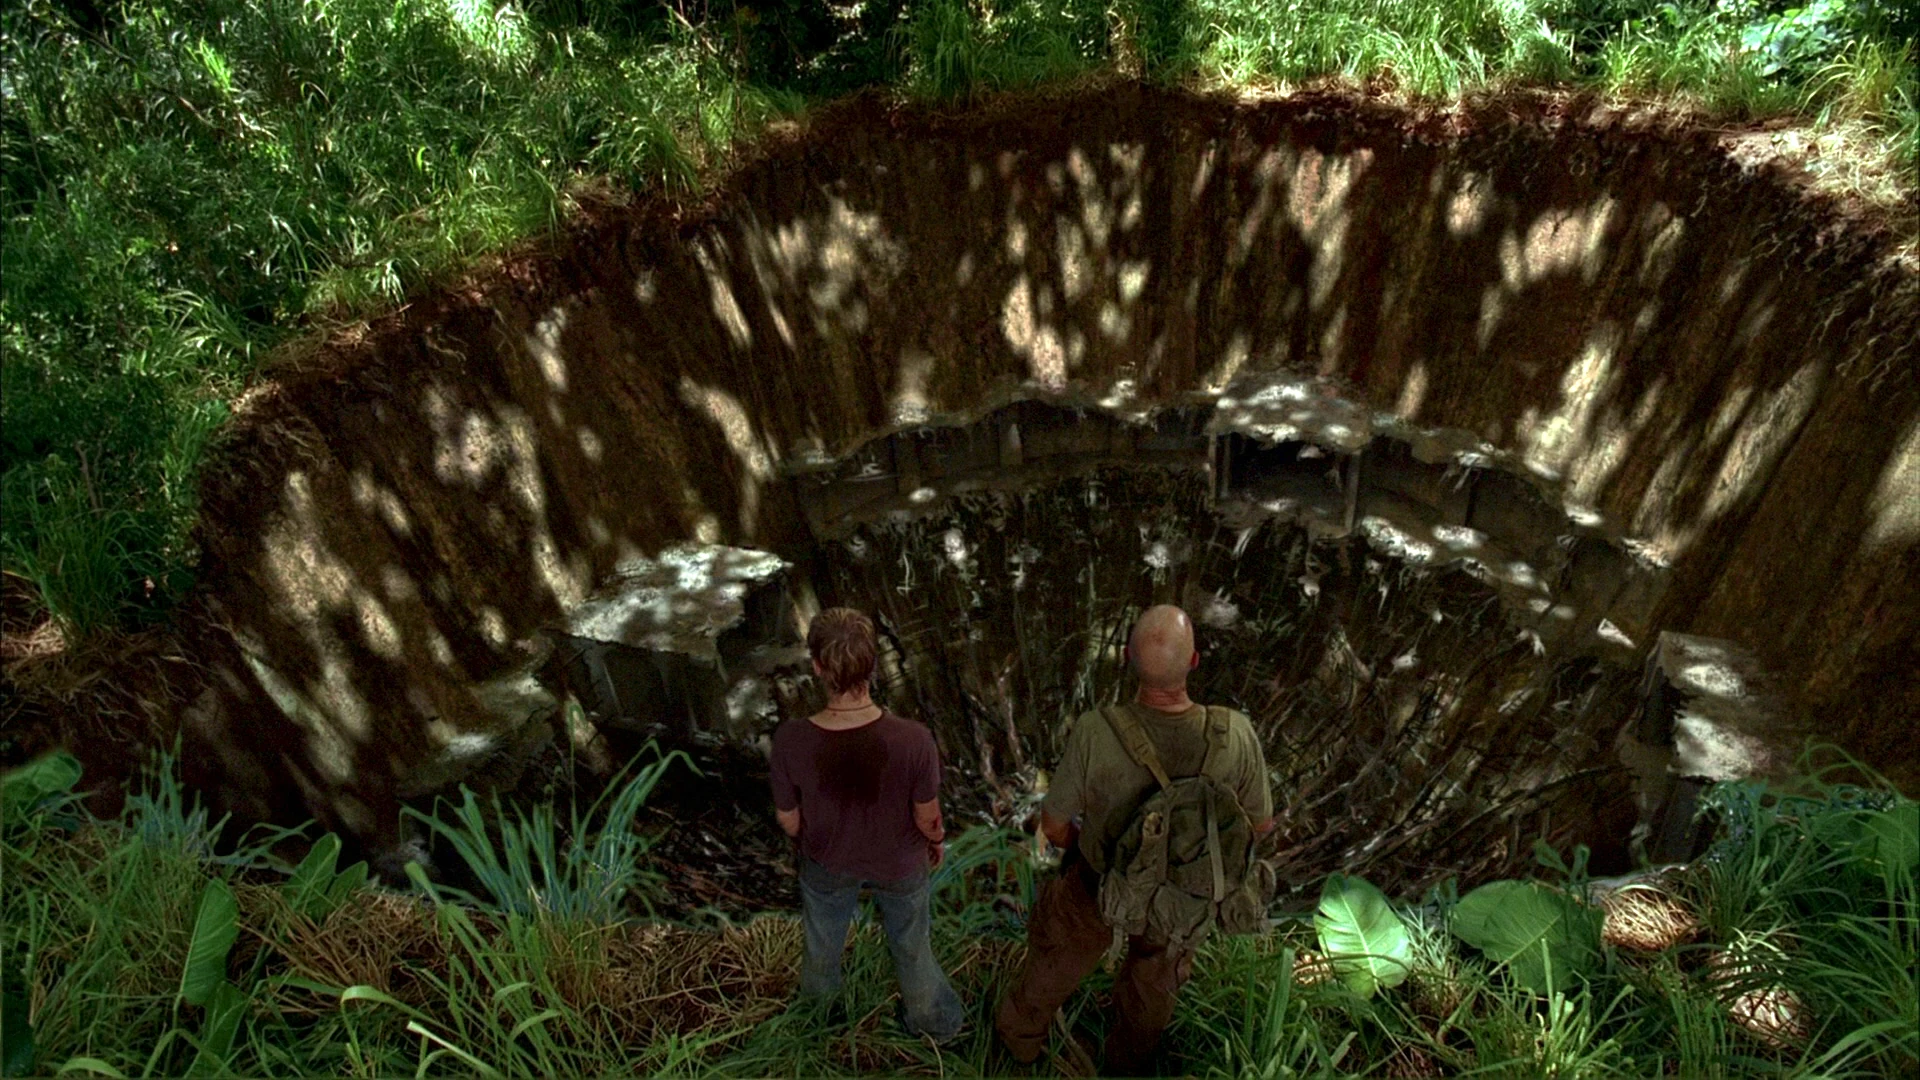
| − | Once the survivors discovered the full [[Swan]] station, they began using the more convenient main airlock entrance. Soon before the station's destruction however, [[Charlie]] and [[Eko]] found themselves locked out of the main station and again turned to using the Hatch. The events of the [[discharge]] then destroyed the Hatch |
+ | Once the survivors discovered the full [[Swan]] station, they began using the more convenient main airlock entrance. Soon before the station's destruction, however, [[Charlie]] and [[Eko]] found themselves locked out of the main station and again turned to using the Hatch. The events of the [[discharge]] then destroyed the Hatch along with the larger station, leaving behind just a huge crater full of debris. {{crossref|2x24|3x03}} |
===Time travel=== |
===Time travel=== |
||
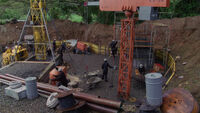
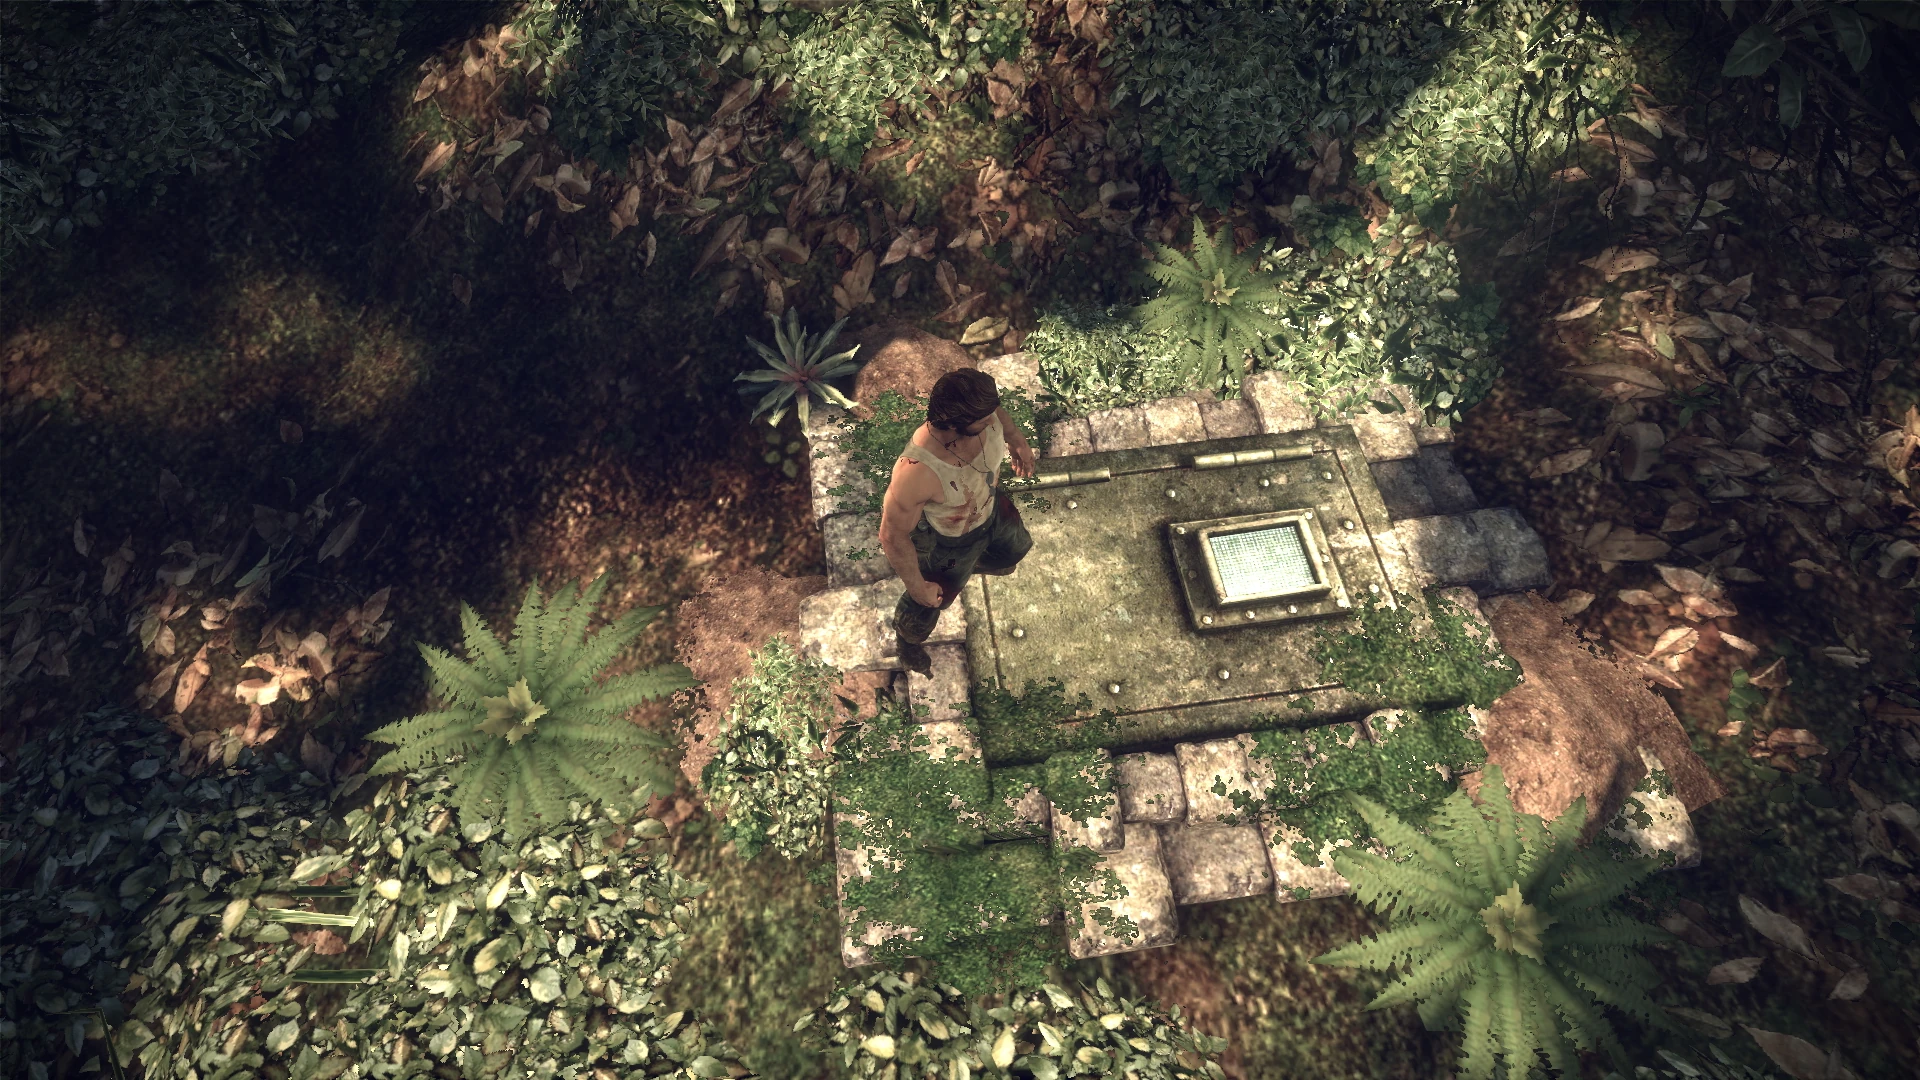
| + | {{I|I=ConstructionSite.jpg|a=left|w=200|c=The Hatch under construction. {{crossref|5x13}}}} |
||
| − | When |
+ | When flashing through time after [[Ben]] turned the [[frozen wheel]], the survivors hiked to the hatch crater as a reference point to determine the date. When they arrived, the hatch was still a crater, but after time shifted again, the hatch returned to how it had been before the survivors discovered it. |
| − | When the survivors found themselves in the 1970s, |
+ | When the survivors found themselves in the 1970s, they got to see the Swan's construction by the DHARMA Initiative. Hurley and [[Miles]] witnessed DHARMA workers engrave [[the Numbers]] onto the Hatch, and were able to see the shaft itself being constructed. |
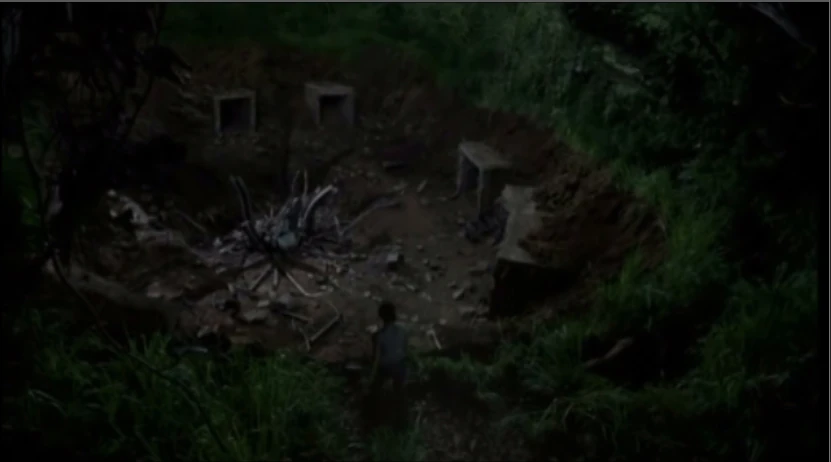
| − | {{I|I=Lost_the_hatch.jpg|w=200|a= |
+ | {{I|I=Lost_the_hatch.jpg|w=200|a=right|c=The imploded Hatch. {{crossref|6x01}}}} |
| − | + | Following the Incident, the survivors returned to 2007, where they found themselves near the Hatch, an imploded crater once more. {{crossref|6x01}} |
|
{{Brclear}} |
{{Brclear}} |
||
| Line 118: | Line 120: | ||
| {{crossref|6x01}} |
| {{crossref|6x01}} |
||
| Was taken there by Locke, Sayid and Jack when they needed to get dynamite from the ''[[Black Rock]]''. |
| Was taken there by Locke, Sayid and Jack when they needed to get dynamite from the ''[[Black Rock]]''. |
||
| − | |||
|- style="font-size:11px; text-align: left;vertical-align:top; background-color:#FFCCCC;" |
|- style="font-size:11px; text-align: left;vertical-align:top; background-color:#FFCCCC;" |
||
| Line 165: | Line 166: | ||
|} |
|} |
||
{{brclear}} |
{{brclear}} |
||
| + | |||
| + | ==Unanswered questions== |
||
| + | |||
| + | {{NavMinor-Unanswered}} |
||
| + | *Why did [[Walt]] tell [[Locke]] not to open the hatch? |
||
==Trivia== |
==Trivia== |
||
| Line 170: | Line 176: | ||
* [[J.J. Abrams]] conceived of the idea of a mysterious hatch on the Island before he and [[Damon Lindelof]] had even written the [[Pilot, Part 1|pilot]]. The quest to open the hatch was to take up much of the first season, and the hatch's contents were planned to reveal more about the island in later seasons.<ref>[http://www.grantland.com/story/_/id/8670609/alan-sepinwall-origins-lost ''Grantland'': 'I Pretty Much Wanted to Die’] Alan Sepinwall, 11/26/2012</ref> |
* [[J.J. Abrams]] conceived of the idea of a mysterious hatch on the Island before he and [[Damon Lindelof]] had even written the [[Pilot, Part 1|pilot]]. The quest to open the hatch was to take up much of the first season, and the hatch's contents were planned to reveal more about the island in later seasons.<ref>[http://www.grantland.com/story/_/id/8670609/alan-sepinwall-origins-lost ''Grantland'': 'I Pretty Much Wanted to Die’] Alan Sepinwall, 11/26/2012</ref> |
||
*In {{ep|5x13}}, the Numbers were engraved onto the face of the hatch itself, and not onto the side, as seen by Hurley in {{ep|1x24}}. This is believed to be a continuity error. |
*In {{ep|5x13}}, the Numbers were engraved onto the face of the hatch itself, and not onto the side, as seen by Hurley in {{ep|1x24}}. This is believed to be a continuity error. |
||
| + | *In the original script for {{ep|1x11}}, the Boone and Locke first discover the hatch submerged in a stream. The dropped flashlight illuminated the shiny metal, rather than being covered in dirt and requiring some digging to find it. |
||
| − | *The Hatch is featured in the video game ''X-Men Origins: Wolverine'', and is accessible on the game's first level. Standing on the hatch unlocks the achievement/trophy called "Found". The movie game is based upon features former Lost cast members [[Dominic Monaghan]] and [[Kevin Durand]]. |
+ | *The Hatch is featured in the video game ''X-Men Origins: Wolverine'', and is accessible on the game's first level. Standing on the hatch unlocks the achievement/trophy called "Found". The movie this game is based upon features former Lost cast members [[Dominic Monaghan]] and [[Kevin Durand]]. |
{{I|I=The_Hatch_in_Just_Cause_2.jpg|w=200|a=right|c=The Hatch in ''Just Cause 2''.}} |
{{I|I=The_Hatch_in_Just_Cause_2.jpg|w=200|a=right|c=The Hatch in ''Just Cause 2''.}} |
||
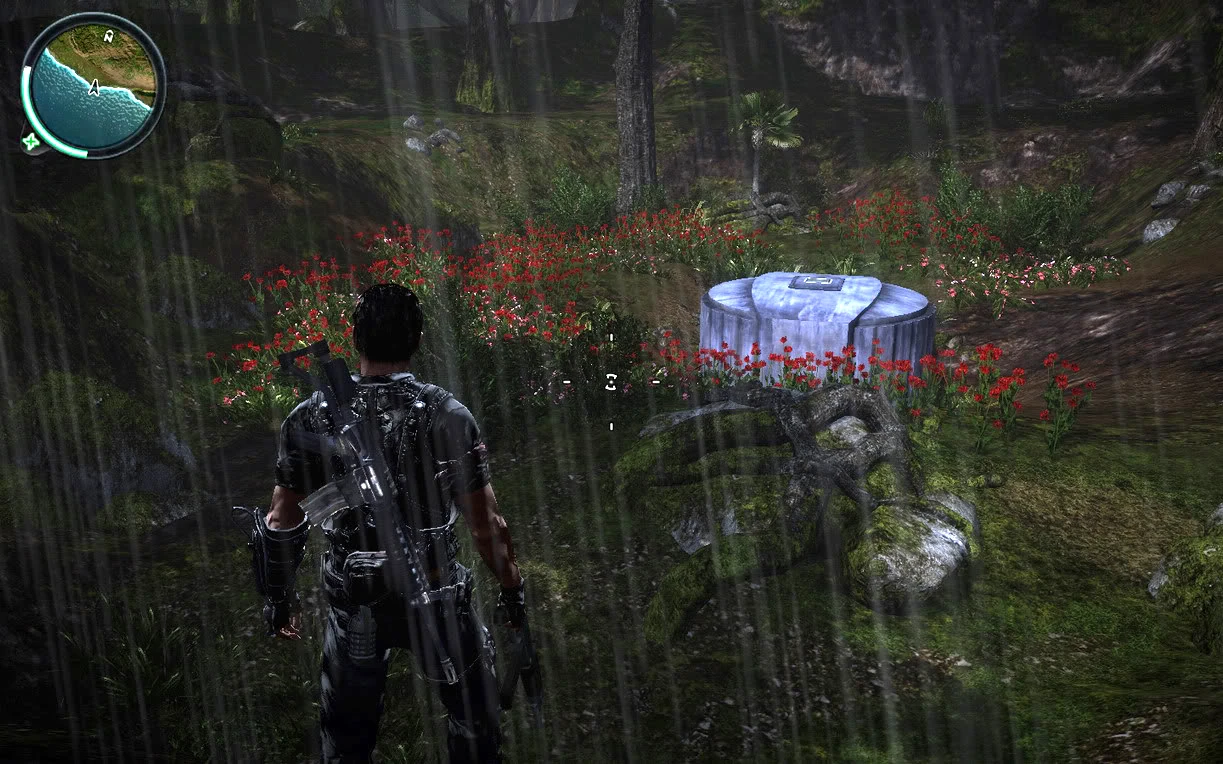
*The Hatch is also featured in the video game ''Just Cause 2'' on an unmarked island. It's located at the in-game coordinates x:1769m, y:4351m. In fact, there are a great deal of references to Lost there. |
*The Hatch is also featured in the video game ''Just Cause 2'' on an unmarked island. It's located at the in-game coordinates x:1769m, y:4351m. In fact, there are a great deal of references to Lost there. |
||
| Line 177: | Line 184: | ||
{{I|I=The_Hatch_in_Call_of_Duty_Modern_Warfare_3.jpg|w=200|a=right|c=The Hatch in ''Call of Duty: Modern Warefare 3''.}} |
{{I|I=The_Hatch_in_Call_of_Duty_Modern_Warfare_3.jpg|w=200|a=right|c=The Hatch in ''Call of Duty: Modern Warefare 3''.}} |
||
*The Hatch can also be found in the ''Wrath of the Lich King'' expansion of the MMORPG ''World of Warcraft'', in the region known as Sholazar Basin, specifically an area called "Bittertide Lake". Passing one's mouse cursor over The Hatch reveals the numbers ''5 9 16 17 24 43''. |
*The Hatch can also be found in the ''Wrath of the Lich King'' expansion of the MMORPG ''World of Warcraft'', in the region known as Sholazar Basin, specifically an area called "Bittertide Lake". Passing one's mouse cursor over The Hatch reveals the numbers ''5 9 16 17 24 43''. |
||
| + | *The Hatch also made an appearance in the video game ''Grand Theft Auto V'' as an easter egg. However, it is deep underwater in the game. |
||
| + | |||
| + | ==Bloopers== |
||
| + | *In "[[All the Best Cowboys Have Daddy Issues]]", the Hatch is seen on a hillside, beside a rocky stream. From "[[Hearts and Minds]]" on, the Hatch is in a jungle clearing. |
||
| + | |||
==Gallery== |
==Gallery== |
||
<gallery> |
<gallery> |
||
Revision as of 02:18, 4 February 2020
The Hatch was a large steel entrance to DHARMA Initiative station 3, the Swan. It was discovered by John Locke and Boone Carlyle. ("All the Best Cowboys Have Daddy Issues") Locke was unsuccessful in his attempts to gain access to it until it was blasted open by dynamite taken from the Black Rock. ("Exodus, Part 2") It was destroyed in the discharge. ("Live Together, Die Alone, Part 1")
History
For a chronological history, see The Swan
Discovery and excavation
The Hatch discovered. ("All the Best Cowboys Have Daddy Issues")
Locke and Boone discovered the Hatch after an unsuccessful hunt for Ethan Rom. Returning to camp, Locke tossed Boone a flashlight, which fell on the steel hatch with a clunk.
Locke sees the light turn on in the Hatch. ("Deus Ex Machina")
The two men spent the next weeks excavating the hatch in secret, uncovering a large round steel tunnel leading down into the earth, topped by a steel door with a small rectangular glass window. They built a trebuchet to try to break the glass open, but it failed to damage the glass, split apart on impact and wounded Locke's leg. The next night, after taking the dying Boone to the caves, Locke banged furiously on the Hatch door, questioning the Island's demands of him until a light turned on from within, restoring his faith. Unbeknownst to Locke, he had alerted the Swan's occupant, Desmond Hume, that life continued outside the station. This dissuaded Desmond from killing himself and convinced him to continue the station's essential protocol. ("All the Best Cowboys Have Daddy Issues") ("Deus Ex Machina") ("Live Together, Die Alone, Part 2")
Entry

Locke sees a beam of light escaping from the Hatch. ("Man of Science, Man of Faith")
Jack decided to open the Hatch to use as a safe hiding place for the survivors of Oceanic Flight 815, following a warning from Danielle Rousseau that the Others were coming, ostensibly to kill them. He, Locke, Dr. Arzt, Kate, and Hurley recovered several sticks of dynamite from the shipwreck of the Black Rock to blow the Hatch open. Hurley protested at the last second, noticing that the Numbers that he considered unlucky engraved into the side of the Hatch. In the final shot of Season 1, Locke and Jack gazed down the Hatch into the long, dark, narrow vertical shaft below. ("Exodus, Part 2")
Locke lowered Kate into the Hatch. Soon after, she was pulled down as a large beam of light came out of the shaft entrance. Desmond had used the beam to blind Kate while he captured her and brought her into the Hatch. Locke descended after her, and Jack lowered himself in soon after. ("Man of Science, Man of Faith")

The imploded Hatch. ("Further Instructions")
Once the survivors discovered the full Swan station, they began using the more convenient main airlock entrance. Soon before the station's destruction, however, Charlie and Eko found themselves locked out of the main station and again turned to using the Hatch. The events of the discharge then destroyed the Hatch along with the larger station, leaving behind just a huge crater full of debris. ("Live Together, Die Alone, Part 2") ("Further Instructions")
Time travel

The Hatch under construction. ("Some Like It Hoth")
When flashing through time after Ben turned the frozen wheel, the survivors hiked to the hatch crater as a reference point to determine the date. When they arrived, the hatch was still a crater, but after time shifted again, the hatch returned to how it had been before the survivors discovered it.
When the survivors found themselves in the 1970s, they got to see the Swan's construction by the DHARMA Initiative. Hurley and Miles witnessed DHARMA workers engrave the Numbers onto the Hatch, and were able to see the shaft itself being constructed.
The imploded Hatch. ("LA X, Part 1")
Following the Incident, the survivors returned to 2007, where they found themselves near the Hatch, an imploded crater once more. ("LA X, Part 1")
Visitors
|
| ||||||||||||
|---|---|---|---|---|---|---|---|---|---|---|---|---|
| Picture | Name | Status | First Visit | Last Visit | Reason for Visit | |||||||
 |
Locke | Dead | ("All the Best Cowboys Have Daddy Issues") | ("Further Instructions") | Discovered this station with Boone on Day 11; tried many techniques to open it until he blasted it open on Day 44. | |||||||
 |
Boone | Dead | ("All the Best Cowboys Have Daddy Issues") | ("Deus Ex Machina") | Discovered this station with Locke on Day 11. | |||||||
 |
Elliott | Alive | (Non-Canon) - Stumbled upon it after Locke had discovered it first. | |||||||||
 |
Sayid | Dead | ("Exodus, Part 1") | ("LA X, Part 1") | Was taken there by Locke when Sayid demanded the truth concerning Boone's last words before his death. | |||||||
 |
Jack | Dead | ("Exodus, Part 1") | ("LA X, Part 1") | Was taken there by Locke and Sayid when they decided to get Jack's opinion on what to do next. | |||||||
 |
Hurley | Alive | ("Exodus, Part 1") | ("LA X, Part 1") | Was taken there by Locke, Sayid and Jack when they needed to get dynamite from the Black Rock. | |||||||
 |
Danielle | Dead | ("Exodus, Part 1") | ("Exodus, Part 1") | Was taken there by Locke, Sayid and Jack when they needed to get dynamite from the Black Rock. | |||||||
 |
Kate | Alive | ("Exodus, Part 2") | ("LA X, Part 1") | Was taken there by Locke, Sayid and Jack when they needed to get dynamite from the Black Rock. | |||||||
 |
Eko | Dead | ("Collision") | ("Live Together, Die Alone, Part 2") | Tried to enter the Swan when he was locked out by Locke and Desmond.
| |||||||
 |
Charlie | Dead | ("The Hunting Party") | ("Live Together, Die Alone, Part 2") | Entered the Hatch with Eko to try to open the blast doors.
| |||||||
 |
Desmond | Alive | ("Man of Science, Man of Faith") | ("Live Together, Die Alone, Part 2") | Grieved after his time-travelling experience dropped him back to the Island.
| |||||||
 |
Miles | Alive | ("Because You Left") | ("LA X, Part 1") | Was taken to this station with Hurley while it was being built by Pierre Chang, and was witness to the engraving of the numbers on the Hatch door. | |||||||
 |
Juliet | Dead | ("Because You Left") | ("LA X, Part 1") | Took part in the Battle at the Swan. | |||||||
Unanswered questions
| Unanswered questions |
|---|
|
- For fan theories about these unanswered questions, see: The Hatch/Theories
Trivia

The Hatch in the video game X-Men Origins: Wolvervine.
- J.J. Abrams conceived of the idea of a mysterious hatch on the Island before he and Damon Lindelof had even written the pilot. The quest to open the hatch was to take up much of the first season, and the hatch's contents were planned to reveal more about the island in later seasons.[1]
- In "Some Like It Hoth", the Numbers were engraved onto the face of the hatch itself, and not onto the side, as seen by Hurley in "Exodus, Part 2". This is believed to be a continuity error.
- In the original script for "All the Best Cowboys Have Daddy Issues", the Boone and Locke first discover the hatch submerged in a stream. The dropped flashlight illuminated the shiny metal, rather than being covered in dirt and requiring some digging to find it.
- The Hatch is featured in the video game X-Men Origins: Wolverine, and is accessible on the game's first level. Standing on the hatch unlocks the achievement/trophy called "Found". The movie this game is based upon features former Lost cast members Dominic Monaghan and Kevin Durand.

The Hatch in Just Cause 2.
- The Hatch is also featured in the video game Just Cause 2 on an unmarked island. It's located at the in-game coordinates x:1769m, y:4351m. In fact, there are a great deal of references to Lost there.
- In Starcraft 2, the Staredit Map Editor features a doodad called "Space Platform Hatch Large". It is an exact replica of the Swan Hatch.
- It is also featured in the game Call of Duty: Modern Warfare 3 on the "Village" map.


The Hatch in Call of Duty: Modern Warefare 3.
- The Hatch can also be found in the Wrath of the Lich King expansion of the MMORPG World of Warcraft, in the region known as Sholazar Basin, specifically an area called "Bittertide Lake". Passing one's mouse cursor over The Hatch reveals the numbers 5 9 16 17 24 43.
- The Hatch also made an appearance in the video game Grand Theft Auto V as an easter egg. However, it is deep underwater in the game.
Bloopers
- In "All the Best Cowboys Have Daddy Issues", the Hatch is seen on a hillside, beside a rocky stream. From "Hearts and Minds" on, the Hatch is in a jungle clearing.
Gallery
")
")
")
")
")
")
")
")
References
- ↑ Grantland: 'I Pretty Much Wanted to Die’ Alan Sepinwall, 11/26/2012