LOST-Graft (talk | contribs) No edit summary |
LOST-Graft (talk | contribs) |
||
| Line 14: | Line 14: | ||
===Video 1: setting up the hack=== |
===Video 1: setting up the hack=== |
||
| − | + | In the bridge area of the ''[[Christiane I]]'', Sam looks at the numbers that he previously figured out are coordinates. While [[Ockham]] momentarily leaves, Sam quickly cuts a wire to the chart plotter, leaving it to appear damaged. When Ockham returns, he tells Sam to take a look at it. After Ockham leaves to tell Talbot, Sam reconnects the wire to the chart plotter and hooks up his hacking software. |
|
<youtube>ytJ15_BhET4</youtube> |
<youtube>ytJ15_BhET4</youtube> |
||
| + | ===Activity 1: hack the chart plotter=== |
||
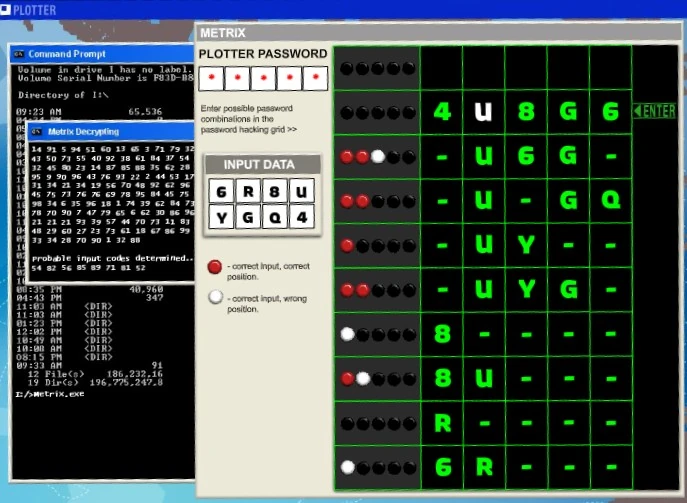
| + | [[Image:Chart plotter hack.jpg|thumb|The password hacking grid]] |
||
| + | The player must attempt to break the chart plotter encryption by finding the correct password combination. Out of eight possible characters, the correct five must be found and placed in the correct position. The activity is based on Mastermind, a board game where a player attempts to break a code made up of a combination of colors. |
||
| + | |||
| + | ===Video: if you lose=== |
||
| + | If the player fails to find the correct password within ten attempts, Sam looks helplessly at Talbot and Ockham as they walk in, catching him in the act. |
||
| + | <youtube>wHTw5WL_uVI</youtube> |
||
| + | |||
| + | ===Video: if you win=== |
||
| + | If players find the correct password, Sam is able to see on the chart plotter where the coordinates are located. Ockham and Talbot return and Ockham notices that the chart plotter is working again. Sam tells him that it was just a loose display cable. Ockham is relieved, but lets Sam know that he will be on call 24/7. When Sam returns to his room, Talbot is there and accuses Sam of lying about the chart plotter. Talbot produces the piece of paper onto which Sam wrote the coordinates, and asks him what they are for. Sam doesn't respond at first, but then he divulges that they came from [[The Maxwell Group]], Talbot's employers. Talbot warns that Sam is getting in over his head and tells him to stay away from the coordinates; he won't find what he is looking for. |
||
| + | <youtube>FBTr4DJGmFo</youtube> |
||
{{Nav-Find815}} |
{{Nav-Find815}} |
||
Revision as of 13:31, 22 January 2008
|
 View Talk Edit | ||||||
|---|---|---|---|---|---|---|---|
| Chapters • Clues • Website • Videos | |||||||
| |||||||
This article details Chapter 4 of ABC's alternate reality game Find 815. In line with the website description, narrative is broken down into story activity, clue hunt, and video diary elements.
January 21, 2008
Introduction
The following text appears in the "Story So Far" tab:
| “ |
Sam's attempt to outwit Talbot and pinpoint the exact position of the coordinates brings unexpected results. |
” |
Recap video
A video appears, briefly summarizing the story up to this point.
Video 1: setting up the hack
In the bridge area of the Christiane I, Sam looks at the numbers that he previously figured out are coordinates. While Ockham momentarily leaves, Sam quickly cuts a wire to the chart plotter, leaving it to appear damaged. When Ockham returns, he tells Sam to take a look at it. After Ockham leaves to tell Talbot, Sam reconnects the wire to the chart plotter and hooks up his hacking software.
Activity 1: hack the chart plotter
The password hacking grid
The player must attempt to break the chart plotter encryption by finding the correct password combination. Out of eight possible characters, the correct five must be found and placed in the correct position. The activity is based on Mastermind, a board game where a player attempts to break a code made up of a combination of colors.
Video: if you lose
If the player fails to find the correct password within ten attempts, Sam looks helplessly at Talbot and Ockham as they walk in, catching him in the act.
Video: if you win
If players find the correct password, Sam is able to see on the chart plotter where the coordinates are located. Ockham and Talbot return and Ockham notices that the chart plotter is working again. Sam tells him that it was just a loose display cable. Ockham is relieved, but lets Sam know that he will be on call 24/7. When Sam returns to his room, Talbot is there and accuses Sam of lying about the chart plotter. Talbot produces the piece of paper onto which Sam wrote the coordinates, and asks him what they are for. Sam doesn't respond at first, but then he divulges that they came from The Maxwell Group, Talbot's employers. Talbot warns that Sam is getting in over his head and tells him to stay away from the coordinates; he won't find what he is looking for.
| ||||||||||||||||||||